Delete Failed DCs from Active Directory

Delete Failed DCs from Active Directory.


Delete Failed DCs from Active Directory

by Daniel Petri – January 8, 2009

How can I delete a failed Domain Controller object from Active Directory?

When you try to remove a domain controller from your Active Directory domain by using Dcpromo.exe and fail, or when you began to promote a member server to be a Domain Controller and failed (the reasons for your failure are not important for the scope of this article), you will be left with remains of the DCs object in the Active Directory. As part of a successful demotion process, the Dcpromo wizard removes the configuration data for the domain controller from Active Directory, but as noted above, a failed Dcpromo attempt might leave these objects in place.

The effects of leaving such remains inside the Active Directory may vary, but one thing is sure: Whenever you’ll try to re-install the server with the same computername and try to promote it to become a Domain Controller, you will fail because the Dcpromo process will still find the old object and therefore will refuse to re-create the objects for the new-old server.

In the event that the NTDS Settings object is not removed correctly you can use the Ntdsutil.exe utility to manually remove the NTDS Settings object.

If you give the new domain controller the same name as the failed computer, then you need perform only the first procedure to clean up metadata, which removes the NTDS Settings object of the failed domain controller. If you will give the new domain controller a different name, then you need to perform all three procedures: clean up metadata, remove the failed server object from the site, and remove the computer object from the domain controllers container.

You will need the following tool: Ntdsutil.exe, Active Directory Sites and Services, Active Directory Users and Computers.

Also, make sure that you use an account that is a member of the Enterprise Admins universal group.

Caution: Using the Ntdsutil utility incorrectly may result in partial or complete loss of Active Directory functionality.

To clean up metadata

  1. At the command line, type Ntdsutil and press ENTER.
C:\WINDOWS>ntdsutil
ntdsutil:
  1. At the Ntdsutil: prompt, type metadata cleanup and press Enter.
ntdsutil: metadata cleanup
metadata cleanup:
  1. At the metadata cleanup: prompt, type connections and press Enter.
metadata cleanup: connections
server connections:
  1. At the server connections: prompt, type connect to server <servername>, where <servername> is the domain controller (any functional domain controller in the same domain) from which you plan to clean up the metadata of the failed domain controller. Press Enter.
server connections: connect to server server100
Binding to server100 ...
Connected to server100 using credentials of locally logged on user.
server connections:

Note: Windows Server 2003 Service Pack 1 eliminates the need for the above step.

  1. Type quit and press Enter to return you to the metadata cleanup: prompt.
server connections: q
metadata cleanup:
  1. Type select operation target and press Enter.
metadata cleanup: Select operation target
select operation target:
  1. Type list domains and press Enter. This lists all domains in the forest with a number associated with each.
select operation target: list domains
Found 1 domain(s)
0 - DC=dpetri,DC=net
select operation target:
  1. Type select domain <number>, where <number> is the number corresponding to the domain in which the failed server was located. Press Enter.
select operation target: Select domain 0
No current site
Domain - DC=dpetri,DC=net
No current server
No current Naming Context
select operation target:
  1. Type list sites and press Enter.
select operation target: List sites
Found 1 site(s)
0 - CN=Default-First-Site-Name,CN=Sites,CN=Configuration,DC=dpetri,DC=net
select operation target:
  1. Type select site <number>, where <number> refers to the number of the site in which the domain controller was a member. Press Enter.
select operation target: Select site 0
Site - CN=Default-First-Site-Name,CN=Sites,CN=Configuration,DC=dpetri,DC=net
Domain - DC=dpetri,DC=net
No current server
No current Naming Context
select operation target:
  1. Type list servers in site and press Enter. This will list all servers in that site with a corresponding number.
select operation target: List servers in site
Found 2 server(s)
0 - CN=SERVER200,CN=Servers,CN=Default-First-Site-Name,CN=Sites,CN=Configuration,DC=dpetri,DC=net
1 - CN=SERVER100,CN=Servers,CN=Default-First-Site-Name,CN=Sites,CN=Configuration,DC=dpetri,DC=net
select operation target:
  1. Type select server <number> and press Enter, where <number> refers to the domain controller to be removed.
select operation target: Select server 0
Site - CN=Default-First-Site-Name,CN=Sites,CN=Configuration,DC=dpetri,DC=net
Domain - DC=dpetri,DC=net
Server - CN=SERVER200,CN=Servers,CN=Default-First-Site-Name,CN=Sites,CN=Configuration,DC=dpetri,DC=net
 DSA object - CN=NTDS Settings,CN=SERVER200,CN=Servers,CN=Default-First-Site-Name,CN=Sites,CN=Configuration,DC=dpetri,DC=net
 DNS host name - server200.dpetri.net
 Computer object - CN=SERVER200,OU=Domain Controllers,DC=dpetri,DC=net
No current Naming Context
select operation target:
  1. Type quit and press Enter. The Metadata cleanup menu is displayed.
select operation target: q
metadata cleanup:
  1. Type remove selected server and press Enter.

You will receive a warning message. Read it, and if you agree, press Yes.

metadata cleanup: Remove selected server
"CN=SERVER200,CN=Servers,CN=Default-First-Site-Name,CN=Sites,CN=Configuration,DC=dpetri,DC=net" removed from server "server100"
metadata cleanup:

At this point, Active Directory confirms that the domain controller was removed successfully. If you receive an error that the object could not be found, Active Directory might have already removed from the domain controller.

  1. Type quit, and press Enter until you return to the command prompt.

To remove the failed server object from the sites

  1. In Active Directory Sites and Services, expand the appropriate site.
  2. Delete the server object associated with the failed domain controller.

To remove the failed server object from the domain controllers container

  1. In Active Directory Users and Computers, expand the domain controllers container.
  2. Delete the computer object associated with the failed domain controller.

  1. Windows Server 2003 AD might display a new type of question window, asking you if you want to delete the server object without performing a DCPROMO operation (which, of course, you cannot perform, otherwise you wouldn’t be reading this article, would you…) Select “This DC is permanently offline…” and click on the Delete button.

  1. AD will display another confirmation window. If you’re sure that you want to delete the failed object, click Yes.

To remove the failed server object from DNS

  1. In the DNS snap-in, expand the zone that is related to the domain from where the server has been removed.
  2. Remove the CNAME record in the _msdcs.root domain of forest zone in DNS. You should also delete the HOSTNAME and other DNS records.

  1. If you have reverse lookup zones, also remove the server from these zones.

Other considerations

Also, consider the following:

  • If the removed domain controller was a global catalog server, evaluate whether application servers that pointed to the offline global catalog server must be pointed to a live global catalog server.
  • If the removed DC was a global catalog server, evaluate whether an additional global catalog must be promoted to the address site, the domain, or the forest global catalog load.
  • If the removed DC was a Flexible Single Master Operation (FSMO) role holder, relocate those roles to a live DC.
  • If the removed DC was a DNS server, update the DNS client configuration on all member workstations, member servers, and other DCs that might have used this DNS server for name resolution. If it is required, modify the DHCP scope to reflect the removal of the DNS server.
  • If the removed DC was a DNS server, update the Forwarder settings and the Delegation settings on any other DNS servers that might have pointed to the removed DC for name resolution.

ESXi Free – how to upgrade to ESXi 5.1 – ESX Virtualization

ESXi Free – how to upgrade to ESXi 5.1 – ESX Virtualization.


ESXi Free – how to upgrade to ESXi 5.1

ESXi Free – the upgrade process to ESXi 5.1 free version

If you’re running the free version of ESXi 5.0 in your homelab or testing it at work, you might be wondering what’s the easy way to upgrade existing ESXi 5.0 installation to the latest ESXi 5.1 without much effort and without breaking your existing installation, without re-installing everything. Your existing VMs won’t be affected.

I’ve already wrote about patching ESXi without vCenter, but this time the command used slightly differ, and here I’m showing you the the steps which needs to be accomplished to upgrade to the latest ESXi 5.1 version. More advanced users can skip, because they’ll probably know this method.


This article is meant to be for every user who don’t uses vSphere update manager for this process. I’m writing it down here for my own bookmarking needs as well. -:)

As you might already read in my article about the changes to the ESXi, there isn’t any vRAM limitation on the free ESXi 5.1 but there is still the 2 physical CPU limit together with the 32Gb physical RAM limit. If not I’d recommend to read those 2 articles:

vSphere 5.1 licensing – vRAM is gone – rather good news, any more?

ESXi 5.1 Free with no vRAM limit but physical RAM limit of 32Gb

The upgrade process from ESXi 5 free version to ESXi 5.1 free version is very straightforward. It takes 3 or 4 steps to complete. All the VMs running on the server must be shut down, because a reboot of the physical host is necessary.

ESXi 5 Free – upgrade to ESXi 5.1 – the steps:

01. Download the offline bundle for ESXi 5.1 at VMware (you’ll need to login through My VMware, or if you don’t have an account, you can create one for free) – file called VMware-ESXi-5.1.0-799733-depot.zip . It’s a 298Mb zip file.

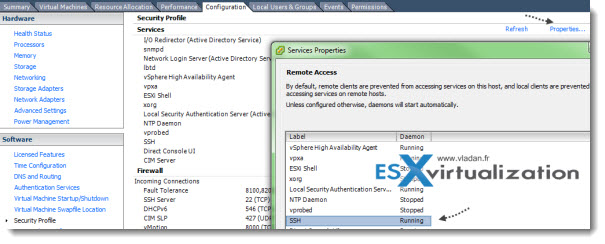
02. Activate SSH and shut down all your VMs running (if not already activated) . You can do it through the vSphere client. Configuration > Security Profile > Properties 

Enable SSh on VMware ESXi through GUI

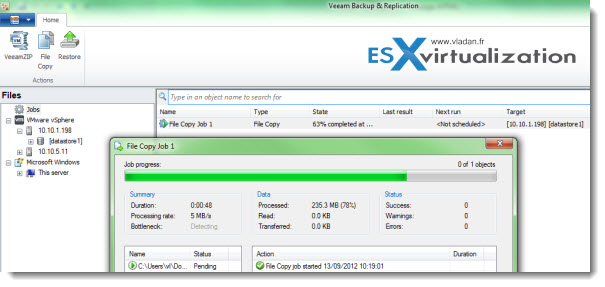
03. Next thing you’ll need to do is to upload the bundle zip file which you just downloaded to the local (or shared) datastore of the ESXi server. You can use the vSphere client and the datastore browser for that or you can use the faster VeeamZIP Free by creating a copy job for the upload of the file to the datastore.

03. Connect by using Putty and execute the following command:

esxcli software profile update -d /vmfs/volumes/datastore1/VMware-ESXi-5.1.0-799733-depot.zip -p ESXi-5.1.0-799733-standard

UPDATE:

Or, you can also invoke this command:

esxcli software profile install -d /vmfs/volumes/datastore1/VMware-ESXi-5.1.0-799733-depot.zip -p ESXi-5.1.0-799733-standard

ESXi 5 upgrade to ESXi 5.1 - how to

04. Reboot the server and you’re done.

In case you want to revert back, just press Shift+R at the boot loader screen…

UPDATE: If you want to upgrade to latest ESXi 5.1 (build 838463), you should see this KB article: VMware ESXi 5.1, Patch Release ESXi510-201210001 and get this file, ESXi510-201210001.zip , from the  VMware download page.

Then use this command (if you’re on ESXi 5.x):

esxcli software vib install -d /vmfs/volumes/[DATASTORE]/[PATCH_FILE].zip

UPDATE 2: If you’re running the free version of ESXi, then put the host into maintenance mode first, then run the command. If you don’t, you might get an error message saying “cannot be live updated” (see the comments bellow).

If you’re running ESXi 4.1 use this command:

esxupdate –bundle=<zip> update

This post – ESXi Free – how to upgrade to ESXi 5.1 – was published on ESX Virtualization website atvladan.fr.

Feel free to subscribe to our RSS Feed.


The Official VCP5 Certification Guide book (New) available at Amazon. 

Buy VMware vSphere Essentials or Essentials Plus Kit and get VMware Go Pro Service for Free Offer Expires 12/16/12


Best VMware Software

VMware Workstation 9
VMware Fusion 5.0.1
VMware vSphere 5 Essentials
VMware vSphere 5 Essentials PLUS

Vladan SEGET

This article was published on ESX Virtualization by Vladan SEGET. ESX Virtualization started as a bookmarking site, but very fast found itself many readers and supporters. Vladan SEGET is an Independent consultant, vExpert 2009 – 2012, VCP 4/5 and owner of this website. Feel free to network via Twitter @vladan or subscribe via RSS.

More Posts – Website – Twitter – Facebook – LinkedIn – Google Plus – YouTube

Datastore Copy and VMotion Errors in Virtual Center VC – Mindwatering Incorporated

Datastore Copy and VMotion Errors in Virtual Center VC – Mindwatering Incorporated.


Datastore Copy and VMotion Errors in Virtual Center (VC)
Mindwatering Incorporated
Tripp W Black on 27.04.2010 at 14:56

Category: VMWare
Host Configuration

Issue:
You want to manually copy a file (or VM’s files) from one datastore to another. Every time you initialize a transfer, you wait about 30 seconds and get an error:
You can do anything local you want on the server’s local datastores, you just cannot transfer anything to or from them. In other words, anything with VMotion or datastore copying returns with “Cannot connect to host“.

Solutions:
Since you can do anything locally on the datastore, this rules out connectivity (network) and obviously the host is up and the network and management agents are both running.
That leaves the question, “Did you recently change your ESXi host’s IP address without a “Reset to Factory Defaults”?
If so, you have to update a file manually for the management agents.
(This is still true in 3.5.x and vSphere 4 for ESX also when changed in Virtual Center. For ESXi, we see this if we change it on the host, too. The only time we don’t see it is moving from DHCP to static..)

PART A: Confirm the Problem
To confirm, look at the /etc/opt/vmware/vpxa.cfg file on the host in the console.
# cat /etc/opt/vmware/vpxa/vpxa.cfg

Inside the <vpxa> and </vpxa> tags, will be a <hostIp> tag. The tag probably shows the old IP. If it shows the old IP, then you’ve found the cause.

Note: For ESXi, you need the hidden console instructions for this. They are at the bottom of these notes.

PART B: Remove the Host from VC and Re-add
Here are the steps:
1. Disconnect the host from VC.
– Select the host, right-click and choose Disconnect.
(We do this to clear data.)

2. Restart the management agents:
ESXi: On the host, click the Customize System <F2> option. Login and choose the Restart Management Agents option.
(Be careful not to click “Reset to Factory Defaults”. That is right below this option.)

ESX: In the console type;
service vmware-vpxa stop
and then
service vmware-vpxa start

3. Disconnect and remove the host from VC.
– Select the host, right-click and choose “Disconnect“.
– Select the italic/grayed-out again, and this time, select “Remove“. Confirm the choice. (Yes, you will lose your historical statistics doing this.)

4. Log into the console on the host and kill/backup the current vpxa.cfg file.
# mv /etc/opt/vmware/vpxa/vpxa.cfg /etc/opt/vmware/vpxa/vpxa.zoldcfg
(The above command backups the old file to a new one called vpxa.zoldcfg. Reconnecting the host will create a new file. This file is not needed. It’s for “just in case”.)

5. Add the Host Back to VC.
Right click the data center, choose Add Host….
Proceed through the wizard, enter the host’s FQDN along with it’s root id and password. Follow the prompts to add it to the data center.

6. Confirm the IP Is Now Correct and Perform Side/Ancillary Tasks.
– At this point you might discover your VMs are “orphaned”. If so, we fixed this by removing the orphaned VMs from inventory and re-adding them via the Datastore browser.
– To confirm that the IP is correct, you can view the vpxa.cfg file again, or simply just copy a file from a local datastore to network one and the other way.
– If it didn’t work, you probably didn’t delete/move/backup the vpxa.cfg file before removing and adding the host.

ESXi Hidden Console Instructions:

Enter the hidden console:
1. Viewing the host’s status screen, hold down <ALT> and click <F1>. You will see a black screen with the server’s version.
2. Type the word unsupported. (There is no prompt, you just type this into “nothing”.)
3. Enter the server’s root password and hit the <ENTER> key.

To leave the hidden console:
1. hold down <ALT> and click <F2>.

Renewing the SSL on a Citrix Xenapp’s server

My Manager went on vacation this week leaving me with the duty of installing an up to date SSL on our secure gateway. I was on vacation the week before her and I do not think she renewed the certificate using IIS. She did somehow however obtain new certificates which are titled server cert_entrustcert, Chain cert_L1Cchain, Root cert_L1Croot, and Entrust remote certificate.

The last time we installed certificates we had to contact our Software Contractor to help with the process because we let the certificate expire and I do not remember how he did it. So now I am left to scramble because the certificate expires 7/6/2012 at midnight. Also add to the problem that I can’t contact our contractor without my manager’s permission and I can’t install these certificates until 7/6 because that will be the one day of this week when the all the remote people are in the office.

So I am left with two options which are to do it on my own or let the certificate expire which creates more problems and would mean no remote connections over the weekend or Monday morning.

Would it be as simple as to right click on the certificates and select install or is it more complicated than that? We are using Citrix Xenapp (don’t know which version) on a Windows 2003 server..

3 Replies

Mel9484 Jul 05, 2012 at 08:42 AM

This would depend on what type of SSL certificate you have. I had a QuickSSL Premium certificate renewal from GeoTrust. Took me few hours to get it right. If you are renewal the certificate from some 3rd party vendor, they always have detailed instructions about the renewal process.

Dianne4702 Jul 05, 2012 at 09:08 PM

Are you sure that your manager didn’t use IIS to renew the certificate as we have always had to go through IIS to request the new certificates and then to install them.

As Mel9484 said depending on where your certificates were obtained you should be able to get instructions on how to install the new certificates.

Also once you have installed the new certificate you will need to make sure that the Citrix secure gateway is pointing to the new certificate. It depends on which version of Citrix you have to exactly what you need to do but you should be able to find help on the Citrix website.

Computer MD Jul 09, 2012 at 05:00 AM

After about 6 agonizing hours, several phone calls, and several emails I was able to figure it out how to implement the SSL. I finished this at 1700 and good thing too because the old SSL expired at 1940 and not midnight like I thought.

1. I found that the people who issued the last SSL had only to renew it with Entrust and did not need me to send them a new request.

2. I had to use MMC to install the new SSL manually in the Personal section of the Certificate store.

3. I had to remove the old SSL from IIS and install the new one

4. I had to use Citrix Secure Gateway Configuration Wizard to assign the SSL to Citrix but ran into a snag when the program said it was unusable

5. After some more research I found that the new SSL did not have a “Private key” on the certificate. I followed the procedures on http://support.microsoft.com/kb/889651 and assigned the key.

6. I ran the Citrix Secure Gateway Configuration Wizard again and this time it accepted the certificate.

Note: One thing I did remember from last year is that if you put the SSL in IIS it has to be a different SSL port number (in this case 444) then the number in Citrix (443). Otherwise there would be a conflict.