error = (converter.fault.CloneFault) Unknown exception | Notes of Windows Admin

error = (converter.fault.CloneFault) Unknown exception

2 Votes

I needed to run P2V conversion across two domains. All the required ports were open, but at 1% of progress I got the error with this message in a log file:

–> state = “error”,

–> cancelled = false,

–> cancelable = true,

–> data = <unset>,

–> error = (converter.fault.CloneFault) {

–> dynamicType = <unset>,

–> faultCause = (vmodl.MethodFault) null,

–> description = “Unknown exception”,

–> msg = “An error occurred during the conversion: ‘Unknown exception’”,

–> },

Even though I should have known that from the beginning, I spent some time searching for the resolution. It was fairly simple.

ESX is very sensitive to DNS. Each and every participating device should be able to resolve its partner’s name. Fixing this with hosts file and new DNS entries wherever possible resolved the issue.

via error = (converter.fault.CloneFault) Unknown exception | Notes of Windows Admin.

VMware KB: Updating VMware Tools fails with the error: Update Tools failed. Edit the virtual machine’s vmx file

Updating VMware Tools fails with the error: Update Tools failed. Edit the virtual machine’s vmx file (2007298)

Symptoms

You are unable to update VMware Tools.

Updating VMware Tools fails.

You see the error:

Update Tools failed. Edit the virtual machine’s vmx file, add the line below and try again. Please read KB article 1714 on tips for editing a vmx file.

isolation.tools.guestInitiatedUpgrade.disable = “FALSE”

Cause

This issue occurs because, for security purposes, updating VMware Tools from within the guest is disabled by default.

Resolution

To resolve this issue, enable VMware Tools updates from within the guest by updating the virtual machine configuration file.

To update the virtual machine configuration file:

In Fusion, Player, or Workstation

Shut down the virtual machine if it is running.

Open the virtual machine configuration file (.vmx) using a text editor. For more information, see:

Fusion: Editing the .vmx file for your Fusion virtual machine (1014782)

Workstation: Tips for editing a .vmx file (1714)

Add this line to the end of the file:

isolation.tools.guestInitiatedUpgrade.disable = “FALSE”

Save and close the .vmx file.

Power on the virtual machine.

Start the VMware Tools upgrade within the guest operating system.

In ESXi/ESX using the vCenter Server GUI

Shut down the virtual machine if it is running.

Open the datastore browser and navigate to the virtual machine directory.

Using the GUI option, download the .vmx to your local desktop.

Create a backup of the .vmx on your local workstation.

Open the .vmx file using a text editor and add this line to the end of the file:

isolation.tools.guestInitiatedUpgrade.disable = “FALSE”

Note: For more information, see Tips for editing a .vmx file (1714).

When saved, upload the file via the datastore browser GUI.

Power on the virtual machine.

Verify functionality before deleting the .vmx backup on your local workstation.

Start the VMware Tools upgrade within the guest operating system.

In ESXi/ESX using the command line

Shut down the virtual machine if it is running.

Open an SSH session to a host. For more information, see Using ESXi Shell in ESXi 5.0 and 5.1 (2004746) or Using Tech Support Mode in ESXi 4.1 and ESXi 5.x (1017910).

Navigate to the virtual machine directory.

Run this command to create a backup of the .vmx file:

cp .vmx .vmx.backup

Open the .vmx file with a text editor and add this line to the end of the file:

isolation.tools.guestInitiatedUpgrade.disable = “FALSE”

Note: For more information, see Editing files on an ESX host using vi or nano (1020302).

Power on the virtual machine.

Verify the virtual machine is functional before deleting the backup file. To delete the backup file, run the command:

– rm .vmx.backup

Start the VMware Tools upgrade within the guest operating system.

Additional Information

Note: To work around this issue, connect directly to the ESXi/ESX host or the vCenter Server and upgrade VMware Tools on the virtual machine. For more information, see General VMware Tools installation instructions (1014294).

Tags

cannot-install-tools  install-vmware-tools-fails  vmware-tools-install-fails  vmware-tools-install-upgrade-fails  vmware-tools-upgrade-fails  upgrading-vmware-tools-fails  missing-setting

See Also

General VMware Tools installation instructions

Editing the .vmx file for your VMware Fusion virtual machine

Using Tech Support Mode in ESXi 4.1 and ESXi 5.x

Editing files on an ESX host using vi or nano

Tips for editing a .vmx file

Using ESXi Shell in ESXi 5.0 and 5.1

Update History

2/27/2012 – Added steps to edit .vmx in ESXi

04/01/2013 – Added information about cause.

09/06/2013 – Added VMware Player 6.x (Windows & Linux) and Workstation 10.x (Windows & Linux) and Fusion 6.x to Product Versions.

via VMware KB: Updating VMware Tools fails with the error: Update Tools failed. Edit the virtual machine’s vmx file.
ESXi Free – how to upgrade to ESXi 5.1 – ESX Virtualization

ESXi Free – how to upgrade to ESXi 5.1 – ESX Virtualization.


ESXi Free – how to upgrade to ESXi 5.1

ESXi Free – the upgrade process to ESXi 5.1 free version

If you’re running the free version of ESXi 5.0 in your homelab or testing it at work, you might be wondering what’s the easy way to upgrade existing ESXi 5.0 installation to the latest ESXi 5.1 without much effort and without breaking your existing installation, without re-installing everything. Your existing VMs won’t be affected.

I’ve already wrote about patching ESXi without vCenter, but this time the command used slightly differ, and here I’m showing you the the steps which needs to be accomplished to upgrade to the latest ESXi 5.1 version. More advanced users can skip, because they’ll probably know this method.


This article is meant to be for every user who don’t uses vSphere update manager for this process. I’m writing it down here for my own bookmarking needs as well. -:)

As you might already read in my article about the changes to the ESXi, there isn’t any vRAM limitation on the free ESXi 5.1 but there is still the 2 physical CPU limit together with the 32Gb physical RAM limit. If not I’d recommend to read those 2 articles:

vSphere 5.1 licensing – vRAM is gone – rather good news, any more?

ESXi 5.1 Free with no vRAM limit but physical RAM limit of 32Gb

The upgrade process from ESXi 5 free version to ESXi 5.1 free version is very straightforward. It takes 3 or 4 steps to complete. All the VMs running on the server must be shut down, because a reboot of the physical host is necessary.

ESXi 5 Free – upgrade to ESXi 5.1 – the steps:

01. Download the offline bundle for ESXi 5.1 at VMware (you’ll need to login through My VMware, or if you don’t have an account, you can create one for free) – file called VMware-ESXi-5.1.0-799733-depot.zip . It’s a 298Mb zip file.

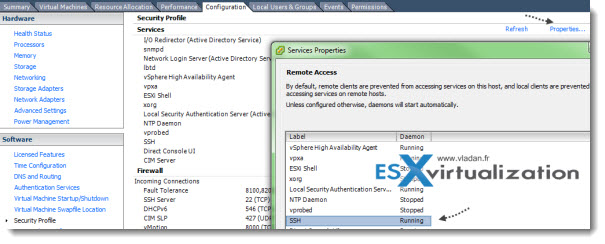
02. Activate SSH and shut down all your VMs running (if not already activated) . You can do it through the vSphere client. Configuration > Security Profile > Properties 

Enable SSh on VMware ESXi through GUI

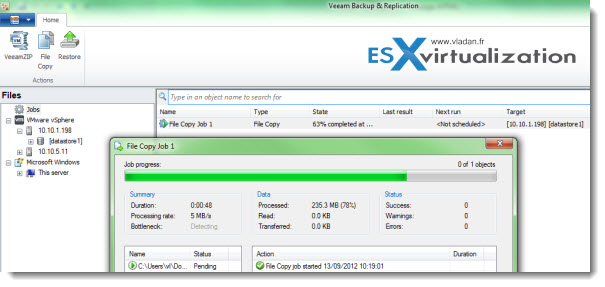
03. Next thing you’ll need to do is to upload the bundle zip file which you just downloaded to the local (or shared) datastore of the ESXi server. You can use the vSphere client and the datastore browser for that or you can use the faster VeeamZIP Free by creating a copy job for the upload of the file to the datastore.

03. Connect by using Putty and execute the following command:

esxcli software profile update -d /vmfs/volumes/datastore1/VMware-ESXi-5.1.0-799733-depot.zip -p ESXi-5.1.0-799733-standard

UPDATE:

Or, you can also invoke this command:

esxcli software profile install -d /vmfs/volumes/datastore1/VMware-ESXi-5.1.0-799733-depot.zip -p ESXi-5.1.0-799733-standard

ESXi 5 upgrade to ESXi 5.1 - how to

04. Reboot the server and you’re done.

In case you want to revert back, just press Shift+R at the boot loader screen…

UPDATE: If you want to upgrade to latest ESXi 5.1 (build 838463), you should see this KB article: VMware ESXi 5.1, Patch Release ESXi510-201210001 and get this file, ESXi510-201210001.zip , from the  VMware download page.

Then use this command (if you’re on ESXi 5.x):

esxcli software vib install -d /vmfs/volumes/[DATASTORE]/[PATCH_FILE].zip

UPDATE 2: If you’re running the free version of ESXi, then put the host into maintenance mode first, then run the command. If you don’t, you might get an error message saying “cannot be live updated” (see the comments bellow).

If you’re running ESXi 4.1 use this command:

esxupdate –bundle=<zip> update

This post – ESXi Free – how to upgrade to ESXi 5.1 – was published on ESX Virtualization website atvladan.fr.

Feel free to subscribe to our RSS Feed.


The Official VCP5 Certification Guide book (New) available at Amazon. 

Buy VMware vSphere Essentials or Essentials Plus Kit and get VMware Go Pro Service for Free Offer Expires 12/16/12


Best VMware Software

VMware Workstation 9
VMware Fusion 5.0.1
VMware vSphere 5 Essentials
VMware vSphere 5 Essentials PLUS

Vladan SEGET

This article was published on ESX Virtualization by Vladan SEGET. ESX Virtualization started as a bookmarking site, but very fast found itself many readers and supporters. Vladan SEGET is an Independent consultant, vExpert 2009 – 2012, VCP 4/5 and owner of this website. Feel free to network via Twitter @vladan or subscribe via RSS.

More Posts – Website – Twitter – Facebook – LinkedIn – Google Plus – YouTube

Datastore Copy and VMotion Errors in Virtual Center VC – Mindwatering Incorporated

Datastore Copy and VMotion Errors in Virtual Center VC – Mindwatering Incorporated.


Datastore Copy and VMotion Errors in Virtual Center (VC)
Mindwatering Incorporated
Tripp W Black on 27.04.2010 at 14:56

Category: VMWare
Host Configuration

Issue:
You want to manually copy a file (or VM’s files) from one datastore to another. Every time you initialize a transfer, you wait about 30 seconds and get an error:
You can do anything local you want on the server’s local datastores, you just cannot transfer anything to or from them. In other words, anything with VMotion or datastore copying returns with “Cannot connect to host“.

Solutions:
Since you can do anything locally on the datastore, this rules out connectivity (network) and obviously the host is up and the network and management agents are both running.
That leaves the question, “Did you recently change your ESXi host’s IP address without a “Reset to Factory Defaults”?
If so, you have to update a file manually for the management agents.
(This is still true in 3.5.x and vSphere 4 for ESX also when changed in Virtual Center. For ESXi, we see this if we change it on the host, too. The only time we don’t see it is moving from DHCP to static..)

PART A: Confirm the Problem
To confirm, look at the /etc/opt/vmware/vpxa.cfg file on the host in the console.
# cat /etc/opt/vmware/vpxa/vpxa.cfg

Inside the <vpxa> and </vpxa> tags, will be a <hostIp> tag. The tag probably shows the old IP. If it shows the old IP, then you’ve found the cause.

Note: For ESXi, you need the hidden console instructions for this. They are at the bottom of these notes.

PART B: Remove the Host from VC and Re-add
Here are the steps:
1. Disconnect the host from VC.
– Select the host, right-click and choose Disconnect.
(We do this to clear data.)

2. Restart the management agents:
ESXi: On the host, click the Customize System <F2> option. Login and choose the Restart Management Agents option.
(Be careful not to click “Reset to Factory Defaults”. That is right below this option.)

ESX: In the console type;
service vmware-vpxa stop
and then
service vmware-vpxa start

3. Disconnect and remove the host from VC.
– Select the host, right-click and choose “Disconnect“.
– Select the italic/grayed-out again, and this time, select “Remove“. Confirm the choice. (Yes, you will lose your historical statistics doing this.)

4. Log into the console on the host and kill/backup the current vpxa.cfg file.
# mv /etc/opt/vmware/vpxa/vpxa.cfg /etc/opt/vmware/vpxa/vpxa.zoldcfg
(The above command backups the old file to a new one called vpxa.zoldcfg. Reconnecting the host will create a new file. This file is not needed. It’s for “just in case”.)

5. Add the Host Back to VC.
Right click the data center, choose Add Host….
Proceed through the wizard, enter the host’s FQDN along with it’s root id and password. Follow the prompts to add it to the data center.

6. Confirm the IP Is Now Correct and Perform Side/Ancillary Tasks.
– At this point you might discover your VMs are “orphaned”. If so, we fixed this by removing the orphaned VMs from inventory and re-adding them via the Datastore browser.
– To confirm that the IP is correct, you can view the vpxa.cfg file again, or simply just copy a file from a local datastore to network one and the other way.
– If it didn’t work, you probably didn’t delete/move/backup the vpxa.cfg file before removing and adding the host.

ESXi Hidden Console Instructions:

Enter the hidden console:
1. Viewing the host’s status screen, hold down <ALT> and click <F1>. You will see a black screen with the server’s version.
2. Type the word unsupported. (There is no prompt, you just type this into “nothing”.)
3. Enter the server’s root password and hit the <ENTER> key.

To leave the hidden console:
1. hold down <ALT> and click <F2>.