Installing and Configuring WebDAV on IIS 7 and Later

By Robert McMurray

March 28, 2014

Introduction

For Internet Information Services (IIS) 7.0 on Windows Server® 2008, Microsoft released a separate, downloadable WebDAV extension module that was completely rewritten. This new WebDAV extension module incorporated many new features that enable Web authors to publish content better than before, and offered Web administrators more security and configuration options. With the release of IIS 7.5, support for a newer WebDAV module was built-in for Microsoft IIS, and Microsoft released an updated version of the downloadable module that had been released for IIS 7.0. This newer version of the WebDAV module provides shared and exclusive locks support to prevent lost updates due to overwrites.

This document walks you through adding WebDAV publishing to an existing Web site by using the new WebDAV user interface and by directly editing the IIS configuration files.

Note: This walkthrough contains a series of steps in which you log on to your Web site using the local loopback address and the local administrator account. When using an administrator account, these steps should only be followed on the server itself using the loopback address or over SSL from a remote server. If you prefer to use a separate user account instead of the administrator account, you must create the appropriate folders and set the correct permissions for that user account when necessary.

IN THIS WALKTHROUGH

Note: This topic discusses using the WebDAV Redirector to connect to your web site. Please see the Using the WebDAV Redirector topic for more information; specifically the “Troubleshooting the WebDAV Redirector” section if you have trouble using the WebDAV redirector.

Prerequisites for Installing and Configuring WebDAV on IIS

The following items are required to complete the procedures in this article:

  • IIS 7.0 or later must be installed on your server, and the following must be configured:
    • The Default Web Site that is created by the IIS 7.0 installation must still exist.
    • The Internet Information Services Manager must be installed.
    • At least one authentication method must be installed. 

      Note: If you choose to use Basic Authentication with the WebDAV redirector, you must connect to your server using HTTPS.

  • The WebDAV Redirector must be installed for Windows Server 2008, Windows Server 2008 R2, or Windows Server 2012. (The WebDAV Redirector is already installed on Windows Vista, Windows 7, and Windows 8.) To install the WebDAV Redirector, use Server Manager to install the Desktop Experience feature.

Installing WebDAV on IIS 7.0

DOWNLOADING THE RIGHT VERSION FOR YOUR SERVER

There are two separate downloadable packages for the new WebDAV extension module; you need to download the appropriate package for your version of Windows Server 2008:

LAUNCHING THE INSTALLATION PACKAGE

You must run the installation package as an administrator. This can be accomplished by one of the following methods:

  • Logging in to your server using the actual account named “Administrator”, then browsing to the download pages listed above or double-clicking the download package if you have saved it to your server.
  • Logging on using an account with administrator privileges and opening a command-prompt by right-clicking theCommand Prompt menu item that is located in the Accessories menu for Windows programs and selecting Run as administrator, then typing the appropriate command listed below for your version of Windows to run the installation:
    • 32-bit Windows Versions:
      • msiexec /i webdav_x86_75.msi
    • 64-bit Windows Versions:
      • msiexec /i webdav_x64_75.msi

WALKING THROUGH THE INSTALLATION PROCESS

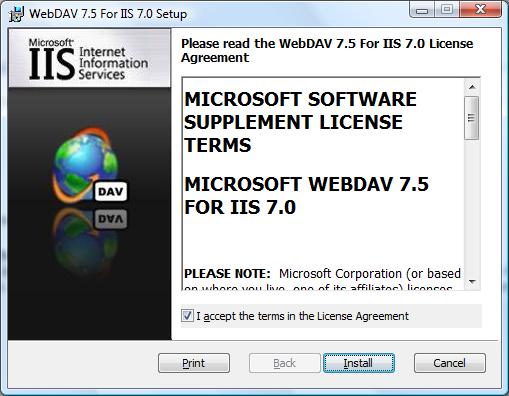
  1. When the installation package opens, you see the following screen. If you agree to the license terms, check the “I accept” box, then click Install.
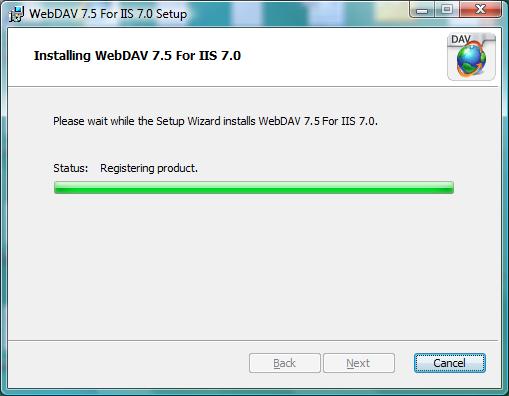
  2. The progress indicator will reflect the status of the installation as it proceeds.
  3. After the installation has completed, click Finish.
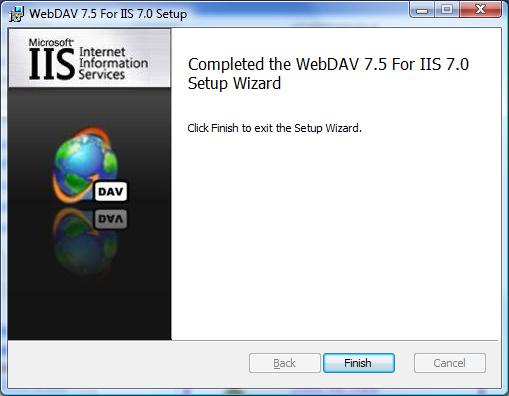
  4. The WebDAV extension module is now installed.

Installing WebDAV on IIS 7.5

IIS 7.5 FOR WINDOWS SERVER 2008 R2

  1. On the taskbar, click Start, point to Administrative Tools, and then click Server Manager.
  2. In the Server Manager hierarchy pane, expand Roles, and then click Web Server (IIS).
  3. In the Web Server (IIS) pane, scroll to the Role Services section, and then click Add Role Services.
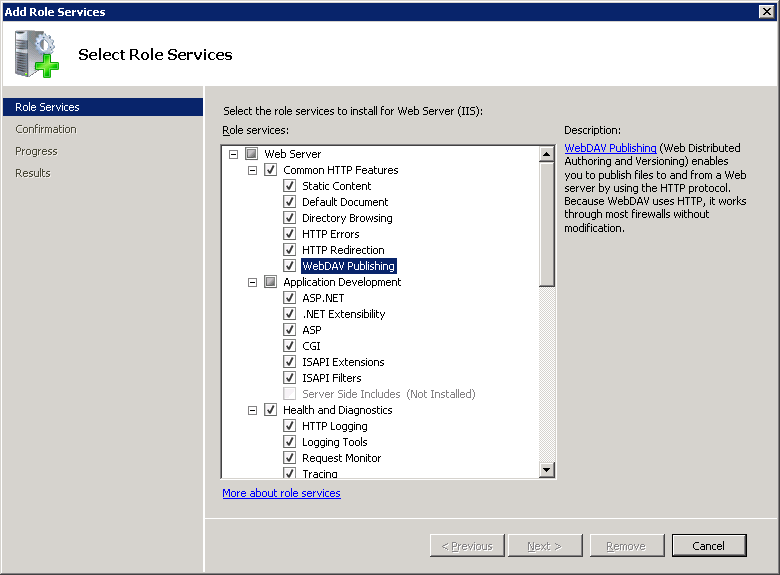
  4. On the Select Role Services page of the Add Role Services Wizard, expand Common HTTP Features, select WebDAV Publishing, and then click Next.
  5. On the Confirm Installation Selections page, click Install.
  6. On the Results page, click Close.

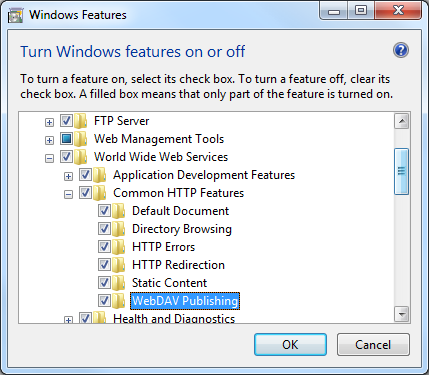
IIS 7.5 FOR WINDOWS 7

  1. On the taskbar, click Start, and then click Control Panel.
  2. In Control Panel, click Programs and Features, and then click Turn Windows Features on or off.
  3. Expand Internet Information Services, then World Wide Web Services, then Common HTTP Features.
  4. Select WebDAV Publishing, and then click OK.
Installing WebDAV on IIS 8.0 and IIS 8.5

IIS 8.0 ON WINDOWS SERVER 2012 AND IIS 8.5 ON WINDOWS SERVER 2012 R2

  1. Click the Server Manager icon on the desktop.
  2. In the Server Manager window, click the Manage menu, and then click Add Roles and Features.
  3. On the Before You Begin page, click Next.
  4. Select the Installation Type and then click Next.
  5. Select the Destination Server, and then click Next.
  6. On the Select Role Services page, expand Web Server (IIS), expand Web Server, expand Common HTTP Features, and then select WebDAV Publishing. Click Next.
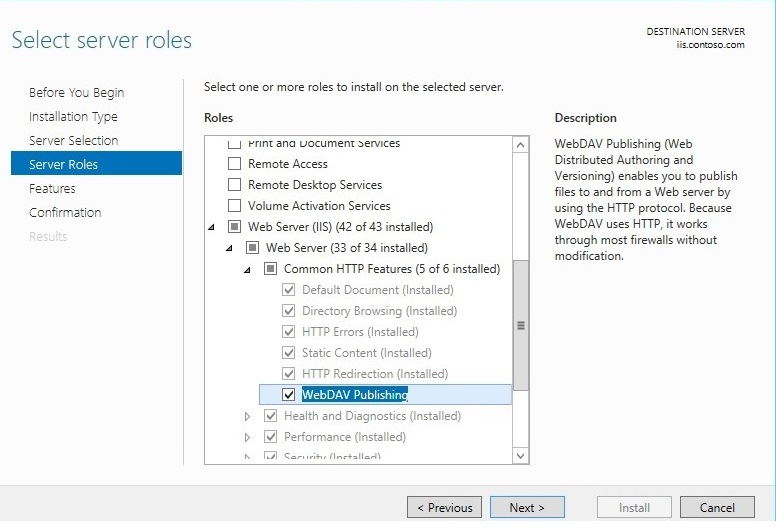
  7. On the Select Features page, click Next.
  8. Confirm the installation selection, and then click Install.
  9. On the Results page, verify that the installation succeeds, and then click Close.
  10. On the Confirm Installation Selections page, click Install.
  11. On the Results page, click Close.

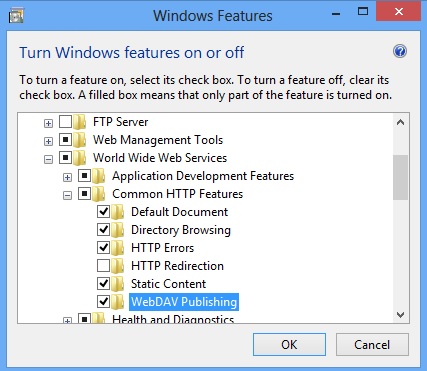
IIS 8.0 FOR WINDOWS 8 AND IIS 8.5 FOR WINDOWS 8.1

  1. On the taskbar, hold down the Windows key, and then press the X key. Click Control Panel.
  2. In the Control Panel, click Programs and Features, and then click Turn Windows Features on or off.
  3. Expand Internet Information Services, then World Wide Web Services, then Common HTTP Features.
  4. Select WebDAV Publishing, and then click OK.
Enabling WebDAV Publishing by Using IIS Manager

The WebDAV extension module makes it easy to add WebDAV publishing to existing sites by providing you with a wizard that walks you through all of the required steps.

Note: The following procedure is performed using IIS 8.5 on Windows Server 2012 R2

STEP 1: ENABLING WEBDAV AND ADDING AN AUTHORING RULE

In this first step, we add WebDAV publishing to the Default Web site, and add the required settings to allow the local administrator account to edit the content.

  1. In IIS Manager, in the Connections pane, expand the Sites node in the tree, then click the Default Web Site.
  2. As shown in the image below, double-click the WebDAV Authoring Rules feature.
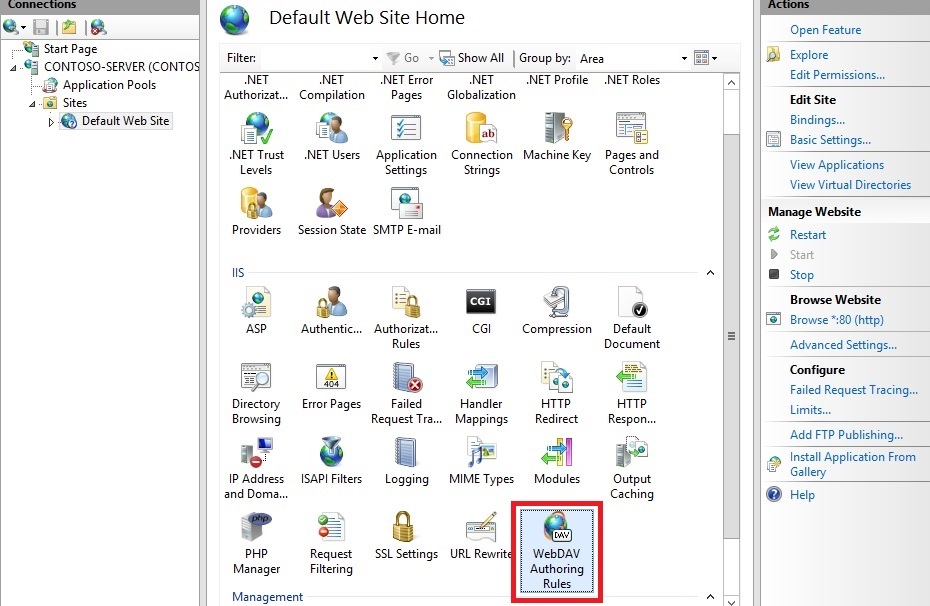
  3. When the WebDAV Authoring Rules page is displayed, click the Enable WebDAV task in the Actions page.
  4. Once WebDAV has been enabled, click the Add Authoring Rule task in the Actions pane.
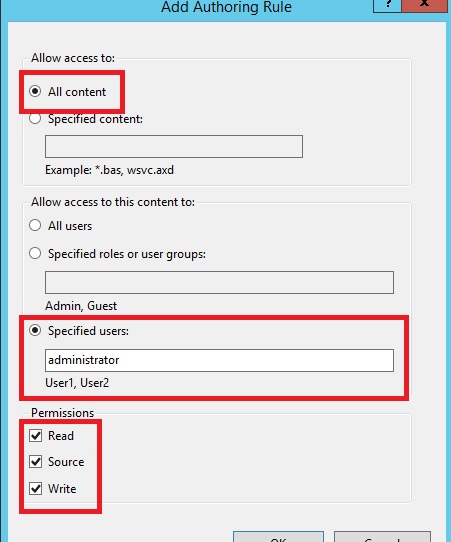
  5. When the Add Authoring Rule dialog appears:
    1. Click All content to specify that the rule applies to all content types.
    2. Choose Specified users and type “administrator” for the user name.
    3. Select Read, Source, and Write for the permissions.
    4. When you have completed these items, click OK.

Summary for enabling WebDAV authoring and adding an authoring rule

Task completed. You have enabled WebDAV authoring on an existing Web site.

To recap the items that you completed in this step, we added WebDAV publishing to the Default Web Site by:

  • Enabling WebDAV for the Web site.
  • Adding an Authoring Rule for the local administrator account for Read, Source, and Write access.

Note: As mentioned earlier, your default request filtering settings may block several file types from WebDAV authoring. If you do not modify your request filtering settings, you may see various errors when you try to publish files that are blocked. For example, if you attempt to upload or download a web.config file you will see errors in your WebDAV client. For more information about configuring your request filtering settings, see the How to Configure WebDAV with Request Filtering walkthrough.

STEP 2: LOGGING IN TO YOUR WEBDAV SITE

In Step 1 above, you enabled WebDAV publishing for your Default Web Site and added an authoring rule for the local administrator account for Read, Source, and Write access to your Web site’s content. In this step, you log in using your administrator account.

Ensuring that you have authorization and authentication configured

  1. In IIS Manager, in the Connections pane, expand the Sites node in the tree, then click the Default Web Site.
  2. Double-click the Authentication feature.
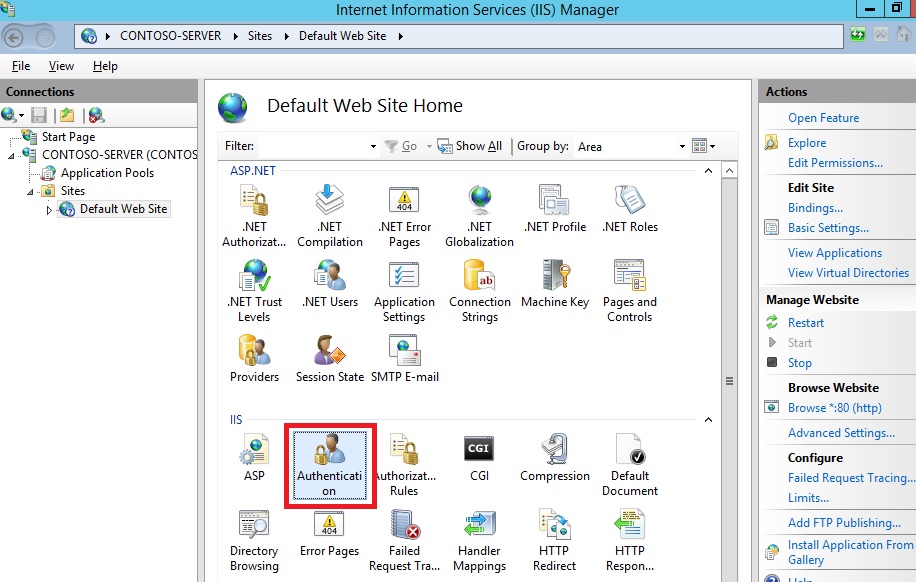
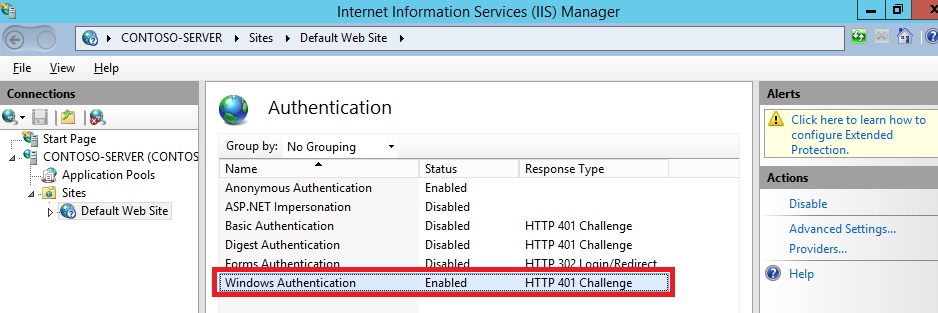
  3. When the Authentication feature opens, make sure that Windows Authentication is enabled. If it is not enabled, selectWindows Authentication, and click Enable in the Action menu.(Note: You can use Basic Authentication with WebDAV, but the WebDAV redirector will only use Basic authentication with SSL connections.)
  4. In IIS Manager, click the Default Web Site under the Sites node in the tree.
  5. Double-click the Authorization Rules feature.
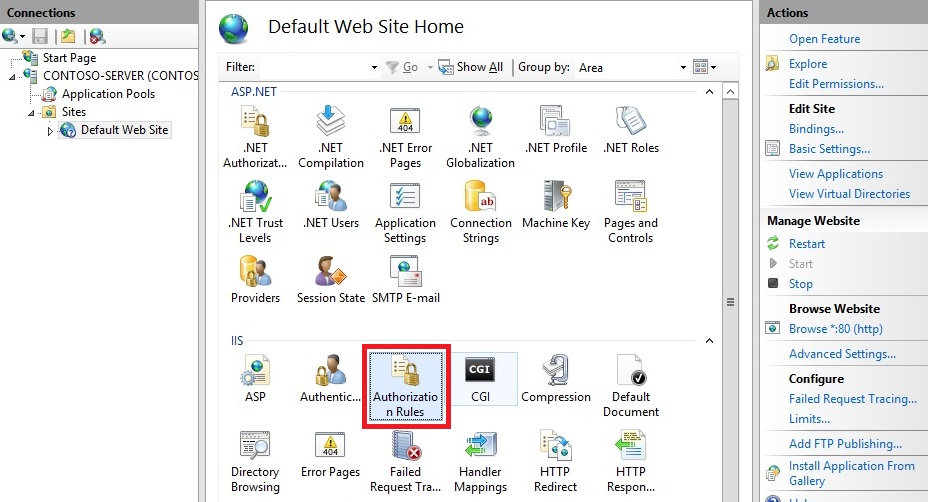
  6. When the Authorization feature opens, make sure that an Allow rule is defined that includes the administrator account. (For example, the default rule for IIS allowing access to All Users will include the administrator account.)

Logging in to your WebDAV site using your administrator account

Logging into your WebDAV site requires the WebDAV Redirector. The WebDAV Redirector is used to publish content to an existing Web site that has the WebDAV nodule installed. You must use Server Manager to install the Desktop Experience feature before you can use the WebDAV redirector. For more information, see Using the WebDAV Redirector.

  1. On your WebDAV server, open a command prompt session.
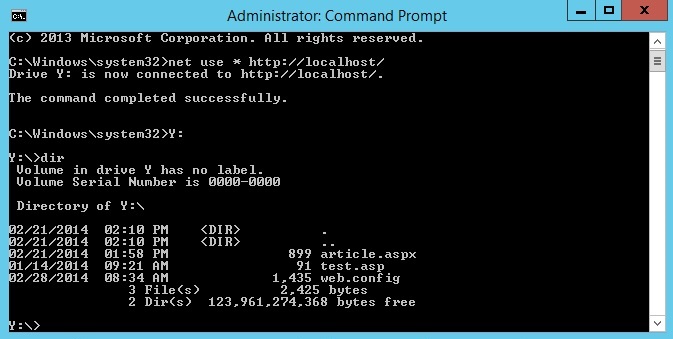
  2. Type the following command to connect to your WebDAV server:

    net use * http://localhost/

You now have a drive mapped to your WebDAV-enabled web site using the local administrator account, and based on the authorization rule that we added in Step 1, you have Read, Write, and Source access to the content folder.
Summary for logging into your WebDAV site

To recap the items that you completed in this step:

  • You verified that your Web site had sufficient authentication and authorization settings.
  • You logged in to your WebDAV site as the local administrator.

Enabling WebDAV Publishing by Editing the IIS Configuration Files

You can also add WebDAV publishing to an existing Web site by editing the IIS configuration files.

Note: Editing your applicationHost.config file requires full administrative permissions. This is best accomplished using one of two methods:

  • Log in to your computer using the local “administrator” account.
  • If you are logged in using an account with administrative permissions that is not the local “administrator” account, open Notepad using the “Run as Administrator” option.

Note: The above steps are required because the User Account Control (UAC) security component in Windows Server 2008 and later will prevent access to your applicationHost.config file. For more information about UAC, please see the following documentation:

The following steps will walk you through all of the required settings to add WebDAV publishing for the Default Web Site.

  1. Using a text editor such as Windows Notepad, open your applicationHost.config file, which is located in your %SystemRoot%\System32\inetsrv\config folder by default.
  2. Scroll to the bottom of your applicationHost.config file and locate the <location> section for your Default Web Site that contains your authentication settings. If this section does not exist, you must add it. This should resemble the following example:

    <location path=”Default Web Site”>
    <system.webServer>
    <security>
    <authentication>
    <anonymousAuthentication enabled=”true” />
    <basicAuthentication enabled=”false” />
    <digestAuthentication enabled=”false” />
    <windowsAuthentication enabled=”true” />
    </authentication>
    </security>
    </system.webServer>
    </location>

  3. Make sure that you have Windows authentication method enabled.
  4. Add a <webdav> section beneath the closing </authentication> tag that will contain your WebDAV settings.
  5. Add an <authoring enabled=”true” /> element to the <webdav> element
  6. Add an <authoringRules> collection with a single entry for <add users=”administrator” path=”*” access=”Read, Write, Source” />.
  7. Your Default Web Site’s settings should now resemble the following example:

    <location path=”Default Web Site”>
    <system.webServer>
    <security>
    <authentication>
    <windowsAuthentication enabled=”true” />
    <anonymousAuthentication enabled=”false” />
    <digestAuthentication enabled=”false” />
    <basicAuthentication enabled=”false” />
    </authentication>
    </security>
    <webdav>
    <authoring enabled=”true” />
    <authoringRules>
    <add users=”administrator” path=”*”
    access=”Read, Write, Source” />
    </authoringRules>
    </webdav>
    </system.webServer>
    </location>

  8. Save your applicationHost.config file.

You should now be able to log in to your WebDAV-enabled site using a WebDAV client using the administrator account, but no other users should be able to access the content using WebDAV.

Summary for adding WebDAV publishing by editing the IIS configuration file

In this task, you added WebDAV publishing to your Default Web Site by editing the IIS configuration files. To recap the items that you completed in this task:

  1. You enabled Windows Authentication for the Default Web Site.
  2. You enabled WebDAV for the Default Web Site.
  3. You added a WebDAV authoring rule for the administrator account with Read, Write, and Source access to the Default Web Site.

Discuss in IIS Forums

Izenda Ad

Oversett denne siden

How to configure volume mount points on a Microsoft Cluster Server

Article ID: 280297 – View products that this article applies to.
System TipThis article applies to a different version of Windows than the one you are using. Content in this article may not be relevant to you.Visit the Windows 7 Solution Center
This article was previously published under Q280297

Collapse imageOn This Page

Collapse imageSUMMARY

With the NTFS volume mount points feature, you can surpass the 26-drive-letter limitation. By using volume mount points, you can graft, or mount a target partition into a folder on another physical disk. volume mount points are transparent to programs. This article discusses how to create volume mount points on a server cluster, and considerations associated with it.Adding a mount point to shared disk is the same as adding a mount point to a non-shared disk. Mount points are added by Win32 API SetVolumeMountPoint, and are deleted by DeleteVolumeMountPoint. This has nothing to do with the disk resource dynamic link library (DLL). The resource DLL is only concerned about the volume global universal identifications (GUIDs), and not the actual mount points.

There are three ways to add mount points to a system (clustered and non-clustered are the same):

  • Logical Disk Manager (Diskmgmt.msc)
  • Mountvol.exe from the command prompt
  • Write your own .exe file, using the Win32 API SetVolumeMountPoint, and DeleteVolumeMountPoint

Collapse imageMORE INFORMATION

When you create a volume mount point on a server cluster, you need to take into consideration the following key items in regards to volume mount points:

  • They cannot go between clustered, and non-clustered disks.
  • You cannot create mount points on the Quorum disk.
  • If you have a mount point from one shared disk to another, you must make sure that they are in the same group, and that the mounted disk is dependent on the root disk.

How to set up volume mount points on a Clustered Server

  1. Log on locally with administrative rights to the node that owns the root disk, into which you are going to be grafting the directory. This is the disk that will contain the mount point.
  2. Open Cluster Administrator (CluAdmin.exe), and pause other nodes in the Cluster.
  3. Partition the disk, and then create the mount point. To do so, follow these steps:
    1. To open Disk Management, click Start, click Run, type diskmgmt.msc, and then click OK.
    2. Select the disk that you would like to graft into the directory.
    3. Right-click the free space on the disk, and then click New Partition.
    4. Create a Primary Partition, and then click Next.
    5. Set the size of the partition.
    6. Select Mount in the following empty NTFS folder, click Browse to browse to the directory in which you would like the mount point to be created, and then click New Folder (this will be the root into which the volume is mounted). Click the newly created folder, click OK, and then click Next.
    7. Format the partition by using the NTFS File System.This is a requirement of both Microsoft Cluster Server (MSCS), and the volume mount points feature.
  4. Create the new Disk resource, and then set dependencies. To do so, follow these steps:
    1. Open Cluster Administrator.
    2. Right-click the group that owns the Shared Disk resource for the disk on which you just created the volume mount point. Click New, and then click Resource.
    3. For the Resource type, click Physical Disk. Verify that it is in the same group as the the root disk. Click Next.
    4. Make sure all nodes are possible owners, and then click Next.
    5. Double-click the root disk, to make this volume mount point disk dependent on the root disk. Click Next.
    6. In the Disk Parameters window, you should see your disk listed. It will be listed by the disk number, and partition number; this is different from standard MSCS disks, which are listed by drive letter. Click Finish.
    7. Right-click the new Disk resource, and then click Bring Online.
  5. Unpause all other nodes, and test that you can fail the group over to every node and access the newly created mount point.

Important The new volume mount point functions on all nodes in the cluster group. However, when you open Windows Explorer or you double-click My Computer on any node other than the node where the volume mount point was created, the new volume mount point may be displayed by using a folder symbol instead of by using a drive symbol. When you right-click the folder symbol and then click Properties, the File System value is set to RAW and not to NTFS.

To configure the volume mount point to display correctly on all nodes in the cluster group, follow these steps.

Note These steps must be performed on all the nodes that will own the volume mount point.

  1. As soon as the volume mount point has been created on node1, manually fail over to node2, and then pause all other nodes in the cluster except node2.
  2. On node2, open Disk Management. To do this, follow these steps:
    1. Click Start, click Administrative Tools, and then click Computer Management.
    2. In the Computer Management MMC snap-in, click Disk Management.
  3. In Disk Management, right-click the mounted volume, and then click Change Drive Letter and Paths.
  4. Select the mount point, click Remove, click Add, and then reassign the same drive letter to the mount point.
  5. Unpause all other nodes.
  6. Repeat steps 1 through 5 until the volume mount point is successfully created on all nodes in the cluster group.

Note After you follow these steps, the following conditions may continue to exist:

  • The volume mount point is still displayed as a folder and not as a drive.
  • The File System value is still set to RAW and not to NTFS.

However, the mount point continues to function correctly. This is a purely cosmetic issue. It is not a functional issue.

Best practices when you use volume mount points

Some best practices for when you are using volume mount points are as follows:

  • Try to use the root (host) volume exclusively for mount points. The root volume is the volume that is hosting the mount points. This greatly reduces the time that it takes to restore access to the mounted volumes if you have to run a chkdsk. This also reduces the time that it takes to restore from backup on the host volume.
  • If you use the root (host) volume exclusively for mount points, the size of the host volume only has to be several MB. This reduces the probability that the volume is used for anything other than the mount points.
  • In a cluster, where high availability is important, you can make redundant mount points on separate host volumes. This helps guarantee that if one root (host) volume is inaccessible, you can still access the data that is on the mounted volume through the other mount point. For example, if HOST_VOL1 (D:) is on Mountpoint1, user data is on LUN3. Then, if HOST_VOL2 (E:) is on Mountpoint1, user data is on LUN3. Therefore, customers can now access LUN3 through either D:\mountpoint1 or through E:\mountpount1.Note Because the user data that is on LUN3 depends on both D: and E: volumes, you have to temporarily remove the dependency of any failed host volume until the volume is back in service. Otherwise, the user data that is on LUN3 remains in a failed state.


http://support.microsoft.com/kb/280297

Gjør suksess med sjømat! – tema – Dagbladet.no

Gjør suksess med sjømat!

På gode, varme sommerdager er dette perfekt mat.
Sjømat er noe av det beste du kan velge når du skal lage lett og fristende ­sommermat. Pakk gjerne en piknikkurv, og nyt maten i det fri!

GROVE SEIBURGERE: Disse burgerne liker alle! Foto: SYNØVE DREYER

GROVE SEIBURGERE: Disse burgerne liker alle! Foto: SYNØVE DREYER

Grove seiburgere med godt tilbehør
(4 burgere)

I nistekurven pakker du gode seikaker, hamburgerbrød, salat, tomater, agurk, løk og dressing. Burgerne legger du sammen like før du skal spise dem.

• 500 g seifilet, uten skinn og bein
• 1 ts salt
• 2 ts potetmel
• ¼ ts pepper
• 1 ss hakket gressløk
• 1 dl melk
• smør til steking

Dressing:
• 1 dl rømme
• 1 dl majones
• 1 ss søt chilisaus
• 1 ss agurkmiks

Tilbehør:
• 1 tomat, i skiver
• ½ agurk, i skiver
• 1 rødløk, i tynne ringer
• 1 hjertesalat
• 4 hamburgerbrød, gjerne grove

1. Bland alt til seikakene i food processor, og kjør det raskt sammen til en grov farse.
2. Stek fire store seikaker i smør i ca. 3 minutter på hver side.
3. Rør sammen dressingen, og smak til.
4. Del brød i to og varm i en brødrister.
5. Legg sammen burgerne med salat i bunnen, seikaker, tomat, agurk, løk og dressing. Små tomater er godt å spise ved siden av.

I stedet for ­hamburgerbrød kan du bruke rundstykker eller ciabatta.


REKE- OG AVOKADOSALAT: Dette er en klassiker som smaker knallgodt med hjemmelaget Thousand Island dressing. Foto: SYNØVE DREYER

REKE- OG AVOKADOSALAT: Dette er en klassiker som smaker knallgodt med hjemmelaget Thousand Island dressing. Foto: SYNØVE DREYER

Reke- og avokadosalat
(4 porsjoner)

Salaten serveres med hjemmelagd Thousand Island-dressing, som er noe helt annet enn den du kjøper ferdig på flaske.

• 250 g rensede reker
• 2 modne avokadoer
• rucolasalat
• 2 ss finstrimlet basilikum
• 3 ss lakserogn

Thousand Island-dressing:
• 1 dl majones
• 3 ss søt chilisaus
• 2 ss hakket grønn paprika
• 2 ss hakket rød paprika
• 2 ss hakket sylteagurk

1. Rør sammen ingrediensene til dressingen. Spe eventuelt med litt agurklake hvis den er for tykk, og smak den til.
2. Del avokadoene, ta ut ­steinene, skrell og skjær i tynne båter.
3. Legg rucola på fat eller i salatbolle med reker, avokado, basilikum og topper av lakserogn over.
4. Server salaten med dress­ingen og godt brød til.


BLÅSKJELL I HVITVIN: Herlig duft, god smak! Foto: SYNØVE DREYER

BLÅSKJELL I HVITVIN: Herlig duft, god smak! Foto: SYNØVE DREYER

Blåskjell i hvitvin
(4 porsjoner)

Dette er den klassiske, franske måten å servere blåskjell på. Vi har kokt dem, men du kan også tilberede i aluminiums­folie over et bål eller på grillen.

• 3 kg blåskjell
• 2 finhakket sjalottløk
• 1 stilker persille
• 1 stilk timian
• 1 laurbærblad
• ca. 3 dl tørr hvitvin

1. Kontroller at alle blåskjellene er tett lukket.
2. Kok opp vin med sjalottløk, persille, timian og laurbærblad.
3. Tilsett blåskjellene, og damp dem under lokk på sterk varme til de åpner seg, ca. 5 minutter. Rist på kokekaret av og til slik at skjellene blir jevnt dampet.
4. Ta skjellene opp med hullsleiv, og fordel dem i dype tallerkener. Sil kraften, og hell den over skjellene. Spis godt brød til.

Rester av blåskjell er fint å bruke som ingrediens i salat.


Blåskjellfakta

• De norske blåskjellene du kjøper over disk, er dyrkede skjell. Skal du høste blåskjell selv, må du ta kontakt med det lokale mattilsynet, som gir klarsignal om skjellene er friske og greie å spise.
• Skjellene må oppbevares ­kjølig til de skal spises. Kontroller at skjellene er levende. ­Levende skjell er tett lukket eller lukker seg raskt når du banker på dem.
• Kast skjell som ikke lukker seg. Når ­skjellene er dampet, må du kaste skjell som ikke åpner seg.

via Gjør suksess med sjømat! – tema – Dagbladet.no.

Kinesiske pannekaker – skikkelig strandmat – tema – Dagbladet.no

KINESISKE PANNEKAKER

De kinesiske pannekakene, som heter jianbing, fyller du med pulled pork og gjerne litt hoisinsaus.

Du trenger:
5 egg
4 ss sukker
1 ss salt
Hvetemel
H-melk
Egg til pensling

Slik gjør du:
1. Pisk sammen egg, sukker og salt.

2. Spe i mel til blandinga blir tykk og seig mens du visper. Spe så i melk mens du visper. Konsistensen skal være litt tynnere enn for normal pannekakerøre.

3. Stek pannekakene i ei middels varm stekepanne. Gni inn panna med et tynt lag olje og stryk ut et tynt lag av røra ved bruk av en stekepalett. Pensle toppen med egg og snu pannekaka over når den er gyllenbrun. Stek så til den er gyllen på eggesiden.

4. Pakk de ferdige pannekakene inn i plastfolie, og de er klare til å tas med i ryggsekken eller strandbagen, for seinere å varmes opp over en grill og fylles med pulled pork eller noe annet godt.

via Pulled pork – skikkelig strandmat – tema – Dagbladet.no.

Pulled pork – skikkelig strandmat – tema – Dagbladet.no

PULLED PORK BELLY

Jan Robin velger ofte å lage pulled pork av tynnribbe i stedet for nakke eller bog.

Du trenger:
1 side tynnribbe
3 røde chili
1 hel hvitløk
1 tommel ingefær
1 ss korianderfrø
1 dl soyasaus
5 dl vann
Litt salt

Slik gjør du:
1. Kutt chili, hvitløk og ingefær i grove biter og legg i ei dyp langpanne. Ha i soya og korianderfrø, legg på ribba med svoren opp og hell over vannet.

2. Dekk over med aluminiumsfolie og bak i ovnen på 150 grader i 2½ time. Når ribba er ferdigstekt, avkjøler du den litt.

3. Ta av skinnet og riv kjøttet over i en bolle ved å bruke to gafler eller hendene. Sil av kraften fra stekinga over i ei stor gryte og la det koke så det reduseres halvveis.

4. Tilsett det plukkede kjøttet og smak til med salt og eventuelt andre krydder du liker godt. Spisskummen, kajennepepper og litt ekstra korianderfrø er nydelig.

5. Da er en god porsjon pulled pork ferdig, og klar til å fordeles i bokser for å tas med ut i parken eller på stranda.

via Pulled pork – skikkelig strandmat – tema – Dagbladet.no.

openSSL: how to extract public key? – Stack Overflow

The following command generates a file which contains both public and private key:

openssl genrsa -des3 -out privkey.pem 2048 

Source: here

With OpenSSL, the private key contains the public key information as well, so a public key doesn’t need to be generated separately

How can we extract the public key from the privkey.pem file?

Thanks.

share|improve this question
add comment

2 Answers

openssl rsa -in privkey.pem -pubout > key.pub 

That writes the public key to key.pub

share|improve this answer
Thanks a lot !! –  Jake Apr 22 ’12 at 19:23
You’re welcome 🙂 –  stewe Apr 22 ’12 at 19:28

add comment

For those interested in the details – you can see what’s inside the public key file (generated as explained above), by doing this:-

openssl rsa -noout -text -inform PEM -in key.pub -pubin 

or for the private key file, this:-

openssl rsa -noout -text -in key.private 

which outputs as text on the console the actual components of the key (modulus, exponents, primes, …)

share|improve

Active Directory Module for Windows PowerShell – Quick start guide

ADPowershell is available starting Windows Server 2008 R2. To play with AD Powershell cmdlets, you must have at least one Windows Server 2008 R2 domain controller (DC) in your domain.

Installing AD Powershell module:

On a Windows Server 2008 R2 box, open an elevated Powershell console window (powershell.exe) and run the following commands:

PS C:\> import-module servermanager
PS C:\> Add-WindowsFeature -Name "RSAT-AD-PowerShell" -IncludeAllSubFeature
NOTE: AD Powershell module is installed by default on a DC.

Loading AD Powershell module:

Open a Powershell console window and type

PS C:\> import-module activedirectoryActive Directory PSDrive:

If the machine is joined to a domain then a default drive named AD: is created. You can CD into this drive and use all the regular file system commands to navigate the directory. The paths are in X500 format.

PS C:\> cd AD:
PS AD:\>
PS AD:\> dir

PS AD:\> cd "DC=fabrikam,DC=com"
PS AD:\DC=fabrikam,DC=com> md "OU=myNewOU"

PS AD:\DC=fabrikam,DC=com> del "OU=myNewOU"
If you want to create a new drive connected to another domain/forest or use the more readable canonical path format, type:

PS C:\> New-PSDrive -PSProvider ActiveDirectory -Server "contoso.fabrikam.com" -Credential "Contoso\Administrator" -Root ""  -Name Contoso -FormatType Canonical

PS C:\> cd Contoso:
PS Contoso:\> dir | ft CanonicalName

PS Contoso:\> cd "contoso.fabrikam.com/"

Getting cmdlet list, help and examples:

Powershell uses verb-noun name-pair format to name cmdlets. For example:

New-ADGroup
Get-ADDomain
To get a list of AD cmdlets type

PS AD:\> get-help *-AD*
PS AD:\> get-help New-AD*        ## would list all the cmdlets that create new AD objects
To get more info on a specific cmdlet or read examples, type

PS AD:\> get-help set-aduser -detailed
PS AD:\> get-help get-aduser -examples
Tips: You can use the tab completion feature of Powershell to complete cmdlet names or parameter names. For example after entering the Verb- part of a cmdlet name you can hit <TAB> key to cycle through all of the nouns available for that verb.

Common tasks:

Here are some examples of commonly performed tasks using AD cmdlets:

PS C:\> New-ADUser –Name "John Smith" –SamAccountName JohnS –DisplayName "John Smith" –Title "Account Manager" –Enabled $true –ChangePasswordAtLogon $true -AccountPassword (ConvertTo-SecureString "p@ssw0rd" -AsPlainText -force) -PassThru

PS C:\> New-ADGroup -Name "Account Managers" -SamAccountName AcctMgrs -GroupScope Global -GroupCategory Security -Description "Account Managers Group" –PassThru

PS C:\> New-ADOrganizationalUnit -Name AccountsDepartment -ProtectedFromAccidentalDeletion $true  -PassThru

PS C:\> Get-ADUser -Filter { name –like "john*" } ## Gets all the users whose name starts with John

PS C:\> Add-ADGroupMember -Identity AcctMgrs -Members JohnS

PS C:\> Get-ADGroupMember -Identity AcctMgrs

PS C:\> Get-ADPrincipalGroupMembership -Identity JohnS  ## Gets all the groups in which the specified account is a direct member.

PS C:\> Get-ADAccountAuthorizationGroup -Identity JohnS  ## Gets the token groups of an account

PS C:\> Unlock-ADAccount -Identity JohnS

PS C:\> Get-ADForest -Current LocalComputer

PS C:\> Get-ADDomain -Current LoggedOnUser

PS C:\> Get-ADDomainController -Filter { name -like "*" }  ## Gets all the DCs in the current domain

What next?

In the next post we will give an overview of Active Directory Powershell and talk about various cmdlets we provide in this release.

Enjoy!
Swami


Swaminathan Pattabiraman [MSFT]
Developer – Active Directory Powershell Team

  • 27 Feb 2009 9:53 AM

    #

    Hello Swaminathan, thanks for opening this blog.

    Why you _require_ -Server parameter in New-PsDrive? You can provide default value for it pointing to current logon server for example. Same about -root parameter which can easily defaults to “” as in your example.

    Why not to make Canonical names default format btw? X500 requres quotes “every,time,when used,because, of, commas”, it right to left so hard to type, and tabcompletion works only on current level ( so you cant do cd mydomain.com\myou\[tab] for example).

    Anyway, thanks even for creating this option at all 🙂

    [PS <560> AD:\] Get-ADDomain

    Get-ADDomain : Parameter set cannot be resolved using the specified named parameters.

    Event if it cant be resolved (why not return my logon domain?) why not to ask me about required parameters, or return all matching objects, like Get-Process do for example?

    Same relates to all other your Get-* cmdlets.

    Get-ADUser -Filter { name –like “john*” } ## Gets all the users whose name starts with John

    Why not Get-ADSomething john* or even Get-ADSomething john ? You can use query by ANR (http://support.microsoft.com/kb/243299) as default parameter, and this will be perfect choice. Or another solution, just dont leave us with this ugly one. BTW, how to get _all_ users? 😉 Get-ADSomething (without params) should work. All other PowerShell cmdlets work this way, just look around.

    Is Get-ADAccountAuthorizationGroup is nothing other but Get-ADPrincipalGroupMembership with recurse parameter?

    Better to add Get-ADGroupMember and Get-ADPrincipalGroupMembership lacks -recurse parameter. This is high resurce consuming operation sometimes, but its very important and popular scenario.

    Why in one case you use “Principal” (Get-ADPrincipalGroupMembership) and in another “Account” (Get-ADAccountAuthorizationGroup)? As it seems to me – its equal meanings there. BTW, IMHO “ADObject” is better and more intuitive 😉

    Again…

    Get-ADDomainController -Filter { name -like “*” }  ## Gets all the DCs in the current domain

    Why not just Get-ADDomainController ? 🙂

    Thats all for today 🙂 I hope my silly critics somehow help you build the real PowerAD 😉 Thanks for your work.

    Vasily Gusev, MVP: Admin Frameworks.

  • 27 Feb 2009 10:56 AM

    #

    Almost forgotten… About Search-ADAccount… There is no such verb as Search- or Find- in PowerShell, and no need in it.

    There is quote from PowerShell concepts about verbs(http://msdn.microsoft.com/en-us/library/ms714428.aspx):

    Get

    Retrieves a resource. For example, the Get-Content cmdlet retrieves the content of a file. Pairs with Set.

    Do not use verbs such as Read, Open, Cat, Type, Dir, Obtain, Dump, Acquire, Examine, Find, or _Search_.

    All this functionality that it provides, must be built in the Get-AD* cmdlets.

    There is no good in building more and more cmdlets just for separate some aspects of same general task (exept if you get bonuses for it ;)). Get-ADObject (Account/Principal/Whatever) should Get any ad objects in any way that I want (I’m dont want to search, i want GET ;)). Get-ADUser/Computer is just special aliases for some popular types.

    Same with Set. Set-ADSomething should set any of Something properties, like password for example. Reset-ADPrincipalPassword doesnt hurt while it “alias” for Set-AdAccount -Password (Get-Credential).

    All this will make AD part of PowerShell better integrate in whole system.

    And… I’m dont noticed formatting of ad objects, just because I think it will be done some time later prior to release. Is it in plans? 🙂

    Vasily Gusev, MVP: Admin Frameworks.

  • 3 Mar 2009 1:57 AM

    #

    Thanks Vasily for the feedback. Here are some answers to specific questions.

    >> 1. Why you _require_ -Server parameter in New-PsDrive?

    -Server parameter is optional in all our cmdlets and by default the cmdlets talk to a suitable DC in the computer’s domain.

    >> 2. -root parameter which can easily defaults to “”

    Fair point.

    >> 3. Regarding – Why not Get-ADSomething john* or even Get-ADSomething john ? You can use query by ANR ..

    >> Get-ADDomainController -Filter { name -like “*” }  ## Gets all the DCs in the current domain

    >> Get-ADDomain : Parameter set cannot be resolved using the specified named parameters.

    We are working on the default behavior of all the cmdlets and the experience should be better in the next release 🙂

    The default parameter set for get directory object cmdlets such as: Get-ADObject, Get-ADUser, Get-ADGroup etc. is -Identity.

    The purpose of -Identity is to uniquely identify an object in a domain. Thus we only support identities (such as: distinguishedName, objectGuid, objectSid and samAccountName) that are guaranteed to be unique by the server. For certain special objects (example: Fine Grained Password policy, Site, Domain controller etc.) we support “name” as the identity.

    We will write more about Identity in a separate blog.

    Since, ANR can potentially return more than objects it does not qualify as Identity. However, you can run a ANR query using filter.

    PS C:\> get-aduser -Filter { anr -eq “John” }

    For getting all users type:

    PS C:\> get-aduser -Filter { name -like “*” }

    >> 4. Is Get-ADAccountAuthorizationGroup is nothing other but Get-ADPrincipalGroupMembership with recurse parameter?

    Not exactly. Get-ADAccountAuthorizationGroup returns all the security groups in which an account is a direct or indirect member. It does not include Distribution Groups.

    The returned set may also include additional groups that system would consider the user a member of for authorization purposes.

    >> 5. Why in one case you use “Principal” (Get-ADPrincipalGroupMembership) and in another “Account” (Get-ADAccountAuthorizationGroup)?

    Good question. We would like to address this in a separate blog. Watch out for a topic on “ADObject model”

    >> 6. About Search-ADAccount… There is no such verb as Search- or Find- in PowerShell, and no need in it.

    It is a valid verb in Powershell V2 (http://blogs.msdn.com/powershell/archive/2007/05/09/proposed-new-standard-verbs.aspx)

    >> 7. There is no good in building more and more cmdlets just for separate some aspects of same general task.

    Again a good question, but I would prefer to address this in a separate blog.

    For now here is a short answer:

    Get-ADUser/ADComputer are not just special aliases. They retrieve additional data and display them in rich format. They also accept data in rich format inside -Filter parameter.

    Similarly, Set-ADUser,Set-ADComputer, New-ADUser, New-ADGroup etc. provides additional/relevant parameters for creating/writing the respective objects.

    >> 8. And… I’m dont noticed formatting of ad objects, just because I think it will be done some time later prior to release. Is it in plans? 🙂

    Ah.. we thought no one would notice 🙂

    Once again thanks for the feedback. Keep them coming.

    Cheers,

    Swami

  • 3 Mar 2009 2:16 AM

    #

    Brandon Shell pointed out an elegant way to get a list of AD cmdlets. Here it is..

    PS C:\> get-command -module ActiveDirectory -verb get

    PS C:\> get-command -module ActiveDirectory -noun ADUser

    Cheers,

    Swami

  • 6 Mar 2009 1:09 AM

    #

    >The default parameter set for get directory object cmdlets such as: Get-ADObject, Get-ADUser, Get-ADGroup etc. is -Identity.

    >get-aduser -Filter { anr -eq “John” }

    You can have more than one default parameter (in different parameter sets), so it can easily be -Identity, and then (if input not valid X500 path) fallback to -Anr.

  • 6 Mar 2009 1:10 AM

    #

    > Ah.. we thought no one would notice 🙂

    You joking? 🙂 This is hard to beleive 🙂

  • 6 Mar 2009 5:41 PM

    #

    @Xaegr

    >> Ah.. we thought no one would notice 🙂

    > You joking? 🙂 This is hard to beleive 🙂

    Yes, I was just joking. Btw, was your comment regarding Provider cmdlet output? Or for all AD cmdlets?

    Cheers,

    Swami

  • 12 Mar 2009 1:23 AM

    #

    No, output from get-aduser is fine for me for example.

    Only one suggestion, please accept wildcard chars for -Properties parameter 🙂 Not all can remember ad property names form objects, so get-aduser someone -prop *logon* will be useful. And get-aduser someone -prop * of course.

  • 12 Mar 2009 10:32 PM

    #

    -Properties parameter does support * and returns all properties + ldap attributes set on the object.

    It does not support wildcard chars on the parameters. You can query the schema to get a list of all ldap attributes that can be set on an AD object.

    Here is a Powershell function that does this:

    function GetPossibleLdapAttributes() {

    Param ([Parameter(Mandatory=$true, Position=0)] [String] $ObjectClass)

    $rootDSE = Get-ADRootDSE

    $schemaObject = get-adobject  -filter { ldapdisplayname -like $ObjectClass } -Properties mayContain, SystemMayContain -searchbase  $rootDSE.SchemaNamingContext

    $schemaObject.MayContain

    $schemaObject.SystemMayContain

    }

    Type:

    PS C:\> GetPossibleLdapAttributes computer

    PS C:\> GetPossibleLdapAttributes user

    Cheers,

    Swami

  • 19 Apr 2009 12:31 PM

    #

    On cmdlets like new-aduser could we have -organizationalunit rather than -path  (an alias on the parameter would be acceptable).

    AD admins think in terms of OUs rather than paths plus it would be consistent with Exchange

  • PeterW
    8 Dec 2011 10:26 AM

    #

    ServerManager Best Practices for AD scan is showing two problems:

    1. ActiveDirectory-Powershell is not installed

    I’ve tried enabling it, but I’m told the feature isn’t recognized, even though dism /online /get-features lists it.

    2. Strict replication consistency should be enabled

    Not sure if I should do this considering the warning about lingering objects and possible forest-wide authentication issues if LOs exist and strict is enabled.

    How can I reinstall the ActiveDirectory-Powershell feature and enable it?

    Should I worry about the strict setting?

    Help!

How do I enable Automatic Logon in Windows 7 when I’m on a domain?

When Windows 7 is joined to a domain the option to automatically login is no longer available in the advanced User Management console. Since I am running a small home domain because of SharePoint and TFS, how would I go about enabling this setting?

The HowToGeek Article here covers it however the options are disabled when joined to a domain.

asked Aug 24 ’09 at 9:32
Diago
15k84669
add comment

2 Answers

From : My Digital Life Article

  1. Click Start, click Run, type regedit, and then click OK. In Windows Vista/7, simply typeregedit in Start Search and hit Enter.
  2. Navigate to the following registry key:

    HKEY_LOCAL_MACHINE\SOFTWARE\Microsoft\Windows NT\CurrentVersion\Winlogon

  3. Double-click the DefaultUserName entry, type the user name to log on with, and then click OK.

    If DefaultUserName registry value name is not found, create a new String Value (REG_SZ)with value name as DefaultUserName.

  4. Double-click the DefaultPassword entry, type the password for the user account under the value data box, and then click OK.

    If there is no DefaultPassword value, create a new String Value (REG_SZ) withDefaultPassword as the value name.

    Note that if no DefaultPassword string is specified, Windows automatically changes the value of the AutoAdminLogon registry key from 1 (true) to 0 (false) to turn off theAutoAdminLogon feature.

  5. In Windows Vista/7, DefaultDomainName has to be specified as well, else Windows will prompt for invalid user name with the user name displayed as .\username. To do so, double click onDefaultDomainName, and specify the domain name of the user account. If it’s local user, specify local host name.

    If the DefaultDomainName does not exist, create a new String Value (REG_SZ) registry key with value name as DefaultDomainName.

  6. Double-click the AutoAdminLogon entry, type 1 in the Value Data box, and then click OK.

    If there is no AutoAdminLogon entry, create a new String Value (REG_SZ) withAutoAdminLogon as the value name.

  7. If it exists, delete the AutoLogonCount key.
  8. Also if it exists, delete the AutoLogonChecked key.
  9. Quit Registry Editor.
  10. Click Start, click Restart, and then click OK.
answered Aug 24 ’09 at 9:45
William Hilsum
86.2k799188
I can confirm this works with a Windows 7 VM joined to the domain. I have mild concerns about how accessible the password in the registry is: no privileges are required to read those keys; but the VM is used soley by me, so hopefully it isn’t too serious. –  jmtd Apr 6 ’11 at 14:20
@jmtd – working, and security best practices are two separate things! I would only recommend this for a kiosk/guest/similar account. –  William Hilsum Apr 6 ’11 at 15:30
1
On a kiosk, you should use Group Policy to disable registry access to prevent users from accessing the logon password. The setting is User Config\Admin Templates\System\Prevent Access to Registry Editing Tools. –  Bacon Bits Apr 19 ’11 at 1:34

add comment

Further to William Hilsum’s answer, this method does not require you to leave the password in plain text in the registry (although I am not sure how the authentication is actually stored).

Step 1

As a local administrator, tell Windows to allow admins to log on automatically.

In Regedit, browse to HKEY_LOCAL_MACHINE\SOFTWARE\Microsoft\Windows NT\CurrentVersion\Winlogon. If it is not there, create a new String Value called AutoAdminLogonSet this value to 1

Step 2

Tell Windows to remember the password for logging in.

In the run box, type control userpasswords2 Ensure your domain username is in the list, if not, add it. Untick (or tick and untick): Users must enter a user name and password to use this computer. Make sure your username is selected. Click Apply.

At this point, Windows should prompt for the password that will be used.

Step 3

Now head back to HKEY_LOCAL_MACHINE\SOFTWARE\Microsoft\Windows NT\CurrentVersion\Winlogon Ensure the following String Values are set, if not, set them:

  • DefaultUserName: Your domain username (without the domain prefix)
  • DefaultDomainName: Your domain

That should be it.

Note on password changes:

You will need to redo this procedure from step 2 each time you change your password. Unfortunately Windows resets the DefaultDomainName to your local machine name every time you save that dialogue, so you have to change it back manually.

answered Sep 3 ’12 at 9:15
It must have been SP1 of Windows 7 that got rid of the “userpasswords2” control panel applet. It doesn’t seem to exist any more. –  Josh M. Dec 12 ’12 at 15:31
It works for me on SP1. Have you run it from the Run box as instructed? It’s not listed in the control panel – you have to run it manually. –  Adam Millerchip Dec 12 ’12 at 21:33
It could be that I’m on a domain and that control panel applet is not available in that case. Not sure why, but it doesn’t come up. I’ve been using control userpasswords2 since 2003 or so. 😉 –  Josh M. Dec 13 ’12 at 3:20
1
Just had a thought. As per the OP’s link, did you also try netplwiz? –  Adam Millerchip Feb 1 ’13 at 6:38

Group Policy Cmdlets in Windows PowerShell

Group Policy Cmdlets in Windows PowerShell

30 out of 40 rated this helpful – Rate this topic

The Windows PowerShell command-line and scripting language can be used to automate many Group Policy tasks, including configuring registry-based policy settings and various Group Policy Management Console (GPMC) tasks. To help you perform these tasks, the Group Policy module for Windows PowerShell provides the cmdlets covered in this section.

You can use these Group Policy cmdlets to perform the following tasks for domain-based Group Policy objects (GPOs):

  • Maintain GPOs: GPO creation, removal, backup, reporting, and import.
  • Associate GPOs with Active Directory Directory Services (AD DS) containers: Group Policy link creation, update, and removal.
  • Set inheritance and permissions on AD DS organizational units (OUs) and domains.
  • Configure registry-based policy settings and Group Policy Preferences Registry settings.

Group Policy Cmdlet Prerequisites

To use the Windows PowerShell cmdlets for Group Policy, you must be running one of the following:

Windows Server 2008 R2 on a domain controller

–or–

Windows Server 2008 R2 on a member server that has the GPMC installed

–or–

Windows® 7 with Remote Server Administration Tools (RSAT) installed. (RSAT includes the GPMC and the Group Policy cmdlets)

Getting Started with the Group Policy Cmdlets

You must use the import-module grouppolicy command to import the Group Policy module before you use the Group Policy cmdlets. You can also modify your Windows PowerShell profile to import the Group Policy module every time you start a session. For more information, see about_Modules.

You can use the get-command –module grouppolicy to get a list of all Group Policy commands.

You can get help for all Group Policy commands at once by using the get-command –module grouppolicy | get-help command.

Ee461027.note(en-us,TechNet.10).gifNote
For more information about the Group Policy cmdlets, you can use the get-help<cmdlet-name> and get-help<cmdlet_name>-detailed commands to display basic and detailed help, respectively. 

Because the information displayed by the get-help cmdlet can span many screens, the help alias is provided to display the first page of information. You can then press the spacebar to view subsequent pages of information. This has the same effect as using the more command—for example, get-help <your parameters> | more


Group Policy Cmdlets

Name Description
Backup-GPO Backs up one GPO or all the GPOs in a domain.
Copy-GPO Copies a GPO.
Get-GPInheritance Retrieves Group Policy inheritance information for a specified domain or OU.
Get-GPO Gets one GPO or all the GPOs in a domain.
Get-GPOReport Generates a report in either XML or HTML format for a specified GPO or for all GPOs in a domain.
Get-GPPermissions Gets the permission level for one or more security principals on a specified GPO.
Get-GPPrefRegistryValue Retrieves one or more registry preference items under either Computer Configuration or User Configuration in a GPO.
Get-GPRegistryValue Retrieves one or more registry-based policy settings under either Computer Configuration or User Configuration in a GPO.
Get-GPResultantSetOfPolicy Outputs the Resultant Set of Policy (RSoP) information to a file, for a user, a computer, or both.
Get-GPStarterGPO Gets one Starter GPO or all Starter GPOs in a domain.
Import-GPO Imports the Group Policy settings from a backed-up GPO into a specified GPO.
New-GPLink Links a GPO to a site, domain, or OU.
New-GPO Creates a new GPO.
New-GPStarterGPO Creates a new Starter GPO.
Remove-GPLink Removes a GPO link from a site, domain, or OU.
Remove-GPO Deletes a GPO.
Remove-GPPrefRegistryValue Removes one or more registry preference items from either Computer Configuration or User Configuration in a GPO.
Remove-GPRegistryValue Removes one or more registry-based policy settings from either Computer Configuration or User Configuration in a GPO.
Rename-GPO Assigns a new display name to a GPO.
Restore-GPO Restores one GPO or all GPOs in a domain from one or more GPO backup files.
Set-GPInheritance Blocks or unblocks inheritance for a specified domain or OU.
Set-GPLink Sets the properties of the specified GPO link.
Set-GPPermissions Grants a level of permissions to a security principal for one GPO or for all the GPOs in a domain.
Set-GPPrefRegistryValue Configures a registry preference item under either Computer Configuration or User Configuration in a GPO.
Set-GPRegistryValue Configures one or more registry-based policy settings under either Computer Configuration or User Configuration in a GPO.

Running Windows PowerShell Scripts

Windows PowerShell Owner's Manual
This is your guide to getting started with Windows PowerShell. Read through these pages to get familiar with Windows PowerShell, and soon you’ll be driving around like a pro.

On This Page

Running Windows PowerShell Scripts
Running Scripts From Within Windows PowerShell
Even More About File Paths
Bonus: “Dot Sourcing” a Script
Running Scripts Without Starting Windows PowerShell
See? That Wasn’t So Bad

Running Windows PowerShell Scripts

Customizing the Conosle

Few things in life are as exciting as getting a brand-new command shell and scripting language; in fact, getting a brand-new command shell and scripting language is so exciting that you can barely get the thing out of the box before you want to take it for a spin. Those of you who’ve downloaded Windows PowerShell know exactly what we’re talking about: if you’re like most people, the very moment the installation process finished you double-clicked a .PS1 file (.PS1 being the file extension for Windows PowerShell scripts), sat back, and waited for the magic to happen.

As it turned out, however, this is what happened:

PowerShell Script in Notepad

Hmmm, instead of running, your script opened up in Notepad. Interesting, but not exactly what you had in mind. Oh wait, you think, I get it: you probably have to run Windows PowerShell before you can run a Windows PowerShell script. OK, that makes sense. And so, with that in mind, you open up Windows PowerShell and type the path to the .PS1 file at the command prompt. You press ENTER and wait for the magic to happen:

As it turned out, however, this is what happens:

File C:\scripts\test.ps1 cannot be loaded because the execution of scripts is disabled on this system. Please see "get-
help about_signing" for more details.
At line:1 char:19
+ c:\scripts\test.ps1 <<<<

Wow; how nice. A new command shell and scripting environment that doesn’t even let you run scripts. What will those guys at Microsoft think of next?

Listen, don’t panic; believe it or not, everything is fine. You just need to learn a few little tricks for running Windows PowerShell scripts. And the Scripting Guys are here to help you learn those tricks.

Running Scripts From Within Windows PowerShell

Customizing the Conosle

Let’s start with running scripts from within Windows PowerShell itself. (Which, truth be told, is probably the most common way to run Windows PowerShell scripts.) Why do you get weird error messages when you try to run a script? That’s easy. The security settings built into Windows PowerShell include something called the “execution policy;” the execution policy determines how (or if) PowerShell runs scripts. By default, PowerShell’s execution policy is set to Restricted; that means that scripts – including those you write yourself – won’t run. Period.

Note. You can verify the settings for your execution policy by typing the following at the PowerShell command prompt and then pressing ENTER:

Get-ExecutionPolicy

Now, admittedly, this might seem a bit severe. After all, what’s the point of having a scripting environment if you can’t even run scripts with it? But that’s OK. If you don’t like the default execution policy (and you probably won’t) then just go ahead and change it. For example, suppose you want to configure PowerShell to run – without question – any scripts that you write yourself, but to run scripts downloaded from the Internet only if those scripts have been signed by a trusted publisher. In that case, use this command to set your execution policy to RemoteSigned:

Set-ExecutionPolicy RemoteSigned

Alternatively, you can set the execution policy to AllSigned (all scripts, including those you write yourself, must be signed by a trusted publisher) or Unrestricted (all scripts will run, regardless of where they come from and whether or not they’ve been signed).

See? No need to need to panic at all, is there?

Note. Not sure what we mean by “signing scripts?” Then open up PowerShell, type the following, and press ENTER:

Get-Help About_Signing

Or, even better, download our Windows PowerShell Graphical Help File and read the same topic in standard Windows help format.

After you change your execution policy settings it’s possible to run scripts. However, you still might run into problems. For example, suppose you change directories from your Windows PowerShell home directory to C:\Scripts (something you can do by typing cd C:\Scripts). As it turns out, the C:\Scripts folder contains a script named Test.ps1. With that in mind you type the following and the press ENTER:

Test.ps1

And here’s the response you get:

The term 'test.ps1' is not recognized as a cmdlet, function, operable program, or script file. Verify the term and try again.
At line:1 char:7
+ test.ps1 <<<<

We know what you’re thinking: didn’t we just change the execution policy? Yes, we did. However, this has nothing to do with the execution policy. Instead, it has to do with the way that PowerShell handles file paths. In general, you need to type the complete file path in order to run a script. That’s true regardless of your location within the file system. It doesn’t matter if you’re in C:\Scripts; you still need to type the following:

C:\Scripts\Test.ps1

Now, we said “in general” because there are a couple of exceptions to this rule. For example, if the script happens to live in the current directory you can start it up using the .\ notation, like so:

.\Test.ps1
Note. There’s no space between the .\ and the script name.

And while PowerShell won’t search the current directory for scripts it will search all of the folders found in your Windows PATH environment variable. What does that mean? That means that if the folder C:\Scripts is in your path then you can run the script using this command:

Test.ps1

But be careful here. Suppose C:\Scripts is not in your Windows path. However, suppose the folder D:\Archive is in the path, and that folder also contains a script named Test.ps1. If you’re in the C:\Scripts directory and you simply type Test.ps1 and press ENTER, guess which script will run? You got it: PowerShell won’t run the script in C:\Scripts, but it will run the script found in D:\Archive. That’s because D:\Archive is in your path.

Just something to keep in mind.

Note. Just for the heck of it, here’s a command that retrieves your Windows PATH environment variable and displays it in a readable fashion:

$a = $env:path; $a.Split(";")

Even More About File Paths

Customizing the Conosle

Now we know that all we have to do is type in the full path to the script file and we’ll never have to worry about getting our scripts to run, right? Right.

Well, almost right. There’s still the matter of scripts whose path name includes a blank space. For example, suppose you have a script stored in the folder C:\My Scripts. Try typing this command and see what happens:

C:\My Scripts\Test.ps1

Of course, by now you’ve come to expect the unexpected, haven’t you? Here’s what you get back:

The term 'C:\My' is not recognized as a cmdlet, function, operable program, or script file. Verify the term and try again.
At line:1 char:8
+ C:\My  <<<< Scripts\Test.ps1

This one you were able to figure out on your own, weren’t you? Yes, just like good old Cmd.exe, PowerShell has problems parsing file paths that include blank spaces. (In part because blank spaces are how you separate command-line arguments from the call to a script.) In Cmd.exe all you can work around this problem by enclosing the path in double quotes. Logically enough, you try the same thing in PowerShell:

"C:\My Scripts\Test.ps1"

And here’s what you get back:

"C:\My Scripts\Test.ps1"

Um, OK …. You try it again. And here’s what you get back:

"C:\My Scripts\Test.ps1"

You try it – well, look, there’s no point in trying it again: no matter how many times you try this command, PowerShell will simply display the exact same string value you typed in. If you actually want to execute that string value (that is, if you want to run the script whose path is enclosed in double quotes) you need to preface the path with the Call operator (the ampersand). You know, like this:

& "C:\My Scripts\Test.ps1"
Note. With this particular command you can either leave a space between the ampersand and the path name or not leave a space between the ampersand and the path name; it doesn’t matter.

To summarize, here’s how you run from scripts from within Windows PowerShell:

  • Make sure you’ve changed your execution policy. By default, PowerShell won’t run scripts at all, no matter how you specify the path.
  • To run a script, specify the entire file path, or either: 1) use the .\ notation to run a script in the current directory or 2) put the folder where the script resides in your Windows path.
  • If your file path includes blank spaces, enclose the path in double quote marks and preface the path with an ampersand.

And, yes, that all takes some getting used to. However, you will get used to it. (To make life easier for you, we recommend that you keep all your scripts in one folder, such as C:\Scripts, and add that folder to your Windows path.)

Note. So can you use PowerShell to add a folder to your Windows Path? Sure; here’s a command (that we won’t bother to explain in this introductory article) that tacks the folder C:\Scripts onto the end of your Windows path:

$env:path = $env:path + ";c:\scripts"

Bonus: “Dot Sourcing” a Script

Customizing the Conosle

Admittedly, up to this point the news hasn’t been all that good: you can’t run a PowerShell script by double-clicking the script icon; PowerShell doesn’t automatically look for scripts in the current working directory; spaces in path names can cause all sorts of problems; etc. etc. Because of that, let’s take a moment to talk about one very cool feature of Windows PowerShell scripting: dot sourcing.

Suppose we have a very simple VBScript script like this one:

A = 5
B = 10
C = A + B

If you run this script from the command window, the script will run just fine. However, because we forgot to include an Echo statement we won’t see anything happen onscreen. Because of that we’ll never know the value of C. Sure, we could try typing Wscript.Echo C at the command prompt, but all we’ll get back is the following error message:

'Wscript.echo' is not recognized as an internal or external command,
operable program or batch file.

That should come as no surprise: scripts are scripts, the command window is the command window, and ne’er the twain shall meet. Sure, it would be nice if the command window had access to values that were assigned in a script (and vice-versa), but it ain’t gonna happen.

At least not in VBScript.

Now, let’s consider a Windows PowerShell counterpart to our VBScript script:

$A = 5
$B = 10
$C = $A + $B

Suppose we run this script, then type $C at the command prompt. What do you think we’ll get back? If you guessed nothing, then you guessed correctly:

Variables

In other words, we don’t get back anything at all. Which, again, should come as no great surprise. Come on, Scripting Guys; shouldn’t this be leading us somewhere?

Yes, it should. And believe it or not, it is. Let’s run our PowerShell script again, only this time let’s “dot source” it; that is, let’s type a period and a blank space and then type the path to the script file. For example:

. c:\scripts\test.ps1

When we run the script nothing will seem to happen; that’s because we didn’t include any code for displaying the value of $C. But now try typing $C at the command prompt . Here’s what you’ll get back:

15

Good heavens! Was this a lucky guess on the part of the PowerShell console, or is this some sort of magic?

Surprisingly enough, it’s neither. Instead, this is dot sourcing. When you dot source a script (that is, when you start the script by prefacing the path to the script file with a dot and a blank space) any variables used in the script become global variables that are available in multiple scopes. What does that mean? Well, a script happens to represent one scope; the console window happens to represent another scope. We started the script Test.ps1 by dot sourcing it; that means that the variable $C remains “alive” after the script ends. In turn, that means that this variable can be accessed via the command window. In addition, these variables can be accessed from other scripts. (Or at least from other scripts started from this same instance of Windows PowerShell.)

Suppose we have a second script (Test2.ps1) that does nothing more than display the value of the variable $C:

$C

Look what happens when we run Test2.ps1 (even if we don’t use dot sourcing when starting the script):

15

Cool. Because $C is a global variable everyone has access to it.

And, trust us here: this is pretty cool. For example, suppose you have a database that you periodically like to muck around with. If you wanted to, you could write an elaborate script that includes each and every analysis you might ever want to run on that data. Alternatively, you could write a very simple little script that merely connects to the database and returns the data (stored in a variable). If you dot source that script on startup you can then sit at the command prompt and muck around with the data all you want. That’s because you have full access to the script variables and their values.

Note. OK, sure, this could cause you a few problems as well, especially if you tend to use the same variable names in all your scripts. But that’s OK; if you ever need to wipe out the variable $C just run the following command (note that, with the Remove-Variable cmdlet, we need to leave off the $ when indicating the variable to be removed):

Remove-Variable C

Play around with this a little bit and you’ll start to see how useful dot sourcing can be.

Running Scripts Without Starting Windows PowerShell

Customizing the Conosle

We realize that it’s been awhile, but way back at the start of this article we tried running a Windows PowerShell script by double-clicking a .PS1 file. That didn’t go quite the way we had hoped: instead of running the script all we managed to do was open the script file in Notepad. Interestingly enough, that’s the way it’s supposed to work: as a security measure you can’t start a PowerShell script by double-clicking a .PS1 file. So apparently that means that you do have to start PowerShell before you can run a PowerShell script.

In a somewhat roundabout way, that’s technically true. However, that doesn’t mean that you can’t start a PowerShell script from a shortcut or from the Run dialog box; likewise you can run a PowerShell script as a scheduled task. The secret? Instead of calling the script you need to call the PowerShell executable file, and then pass the script path as an argument to PowerShell.exe. For example, in the Run dialog box you might type a command like powershell.exe -noexit c:\scripts\test.ps1:

Running Scripts from the Run Dialog

There are actually three parts to this command:

  • Powershell.exe, the Windows PowerShell executable.
  • -noexit, an optional parameter that tells the PowerShell console to remain open after the script finishes. Like we said, this is optional: if we leave it out the script will still run. However, the console window will close the moment the script finishes, meaning we won’t have the chance to view any data that gets displayed to the screen.

    Incidentally, the -noexit parameter must immediately follow the call to the PowerShell executable. Otherwise the parameter will be ignored and the window will close anyway.

  • C:\Scripts\Test.ps1, the path to the script file.

What if the path to the script file contains blank spaces? In that case you need to do the ampersand trick we showed you earlier; in addition, you need to enclose the script path in single quote marks, like so:

powershell.exe -noexit &'c:\my scripts\test.ps1'

Strange, but true!

Note. Here’s an interesting variation on this same theme: instead of starting PowerShell and asking it to run a particular script you can start PowerShell and ask it to run a particular command. For example, typing the following in the Run dialog box not only starts PowerShell but also causes it to run the Get-ChildItem cmdlet against the folder C:\Scripts:

powershell.exe -noexit get-childitem c:\scripts

It’s possible to get even more elaborate when starting Windows PowerShell, but this will do for now. If you’d like more information on PowerShell startup options just type powershell.exe /? from either the Windows PowerShell or the Cmd.exe command prompt.

By the way, this is the same approach you need to use if you want to run a Windows PowerShell script as part of a logon script. You can’t simply assign a .PS1 file as a logon script; the operating system won’t know what to do with that. Instead, you’ll need to create a VBScript script that calls the PowerShell script:

Set objShell = CreateObject("Wscript.Shell")
objShell.Run("powershell.exe -noexit c:\scripts\test.ps1")

Assign this VBScript script as the logon script and everything should work just fine. (Assuming, of course, that you’ve installed Windows PowerShell on any computers where this logon script is going to run.)

See? That Wasn’t So Bad

Customizing the Conosle

Admittedly, running Windows PowerShell scripts might not be as straightforward and clear-cut as it could be. On the other hand, it won’t take you long to catch on, and you’ll soon be running PowerShell scripts with the best of them. Most important, you’ll also be able to say things like, “You know, you really ought to dot source that script when you run it.” If that doesn’t impress your colleagues then nothing will.

Windows PowerShell Owner’s Manual