Five Command Line Tools for Managing Group Policy

Five Command Line Tools for Managing Group Policy

Follow Our Daily Tips

• facebook.com/TechNetTips

• twitter.com/TechNetTips

• blogs.technet.com/tnmag

Here are five command line tools you should keep handy when managing Group Policy throughout your organization.

GPMC If you know anything about Group Policy, you probably know that GPMC is used to manage Active Directory-based Group Policy. GPMC provides a comprehensive set of Component Object Model (COM) interfaces that you can use to script many operations.

GPFIXUP This is used to resolve domain name dependencies in Group Policy objects and Group Policy links after a domain rename operation.

GPRESULT You can use this tool to see what policy is in effect and to troubleshoot policy problems.

GPUPDATE This lets you refresh Group Policy manually. Gpupdate replaces the SECEDIT /refreshpolicy tool that was available in Windows 2000. If you type gpupdate at a command prompt, both the Computer Configuration settings and the User Configuration settings in Group Policy will be refreshed on the local computer.

LDIFDE This tool is used to import and export directory information. You can use LDIFDE to help you perform advanced backup and recovery of policy settings that are stored outside of GPOs. Specifically, you can use this tool to back up and restore a large number of Windows Management Instrumentation (WMI) filters at one time.

Tip adapted from Windows Group Policy Administrator’s Pocket Consultant by William Stanek.

via Five Command Line Tools for Managing Group Policy.

Query in CMD for FSMO Roles

Question

1

Sign in to vote

Hello,

Is there some command in DOS or PowerShell to quickly determine where are FSMO roles in AD?

Thank you.

Monday, September 10, 2012 5:33 AM

Reply | Quote |

ChristianGomez19805 Points

Answers

2

Sign in to vote

Hi Christian!

Try this:

netdom query fsmo

Regards!

Pablo Ariel Di Loreto

IT Consultant

This posting is provided “AS IS” with no warranties and confers no rights! Always test ANY suggestion in a test environment before implementing!

Marked as answer by ChristianGomez1980 Monday, September 10, 2012 5:41 AM

Monday, September 10, 2012 5:37 AM

Reply | Quote |

Pablo Ariel Di LoretoAlgeiba IT (Partner) 4,340 Points

1

Sign in to vote

Christian!

Netdom is a command-line tool that you can use from CMD (and will work from PowerShell too).

Please see: http://technet.microsoft.com/en-us/library/cc835089(v=ws.10).aspx

Regards!

Pablo Ariel Di Loreto

IT Consultant

This posting is provided “AS IS” with no warranties and confers no rights! Always test ANY suggestion in a test environment before implementing!

Marked as answer by ChristianGomez1980 Monday, September 10, 2012 5:52 AM

Monday, September 10, 2012 5:48 AM

Reply | Quote |

Pablo Ariel Di LoretoAlgeiba IT (Partner) 4,340 Points

1

Sign in to vote

You can simply open cmd and execute the command netdom query fsmo this will list the FSMO role holder server.You can also check the same from GUI or ntdsutil.See below link how to check the same.

http://www.petri.co.il/determining_fsmo_role_holders.htm

FSMO Roles and PowerShell

FSMO Roles and PowerShell

Best Regards,

Sandesh Dubey.

MCSE|MCSA:Messaging|MCTS|MCITP:Enterprise Adminitrator | My Blog

Disclaimer: This posting is provided “AS IS” with no warranties or guarantees , and confers no rights.

via Query in CMD for FSMO Roles.

How to extend AD schema without replicating to other servers – itbl0b

Hi guys,

In this post I’m going to talk about a safer way to extend Active Directory Schema – if you have to.

Let me start by stating this – I’m in the business for quite some time, I’ve extended the schema many times – for Exchange upgrades, for Domain upgrades, for lync and etc…. each and every one of the upgrades was successful without any problems.

But, from time to time I get the question from clients – what if anything goes wrong? How can I be sure that the process is safe?

As you all probably know – extending the schema is irreversible! You can’t just undo this.

Many of you probably think that if anything goes wrong they can simply just do an Authoritative Restore of the Active Directory, and that will solve their problem. Wrong! Authoritative Restore does not restore Schema to an older version. It does, but it restores it with orphaned objects, and that means that other DC’s in the domain will just ignore that Schema Version. The proper way to restore an Active Directory Schema is by removing all Domain Controllers from the network, installing one from scratch, restoring the SystemState on that server and then running Authoritative Restore on that new DC. Then just installing new DC’s…

You can read more on the subject on that Technet page:

http://technet.microsoft.com/en-us/library/cc961934.aspx

to quote:

“Only the domain and configuration domain directory partitions can be marked as authoritative. The schema cannot be authoritatively restored because it might endanger data integrity. For example, if the schema was modified, and then objects of the new or modified classSchema object were created, subsequent authoritative restore might replace the new or modified classes causing serious data consistency problems.”

So the question is – how can I make sure that I have a way back if anything goes wrong?

Well in a case a client of mine wants to be 100% sure that he can revert the process, here’s what I do:

1. If I have more than one Domain Controllers, I take the DC that holds the Schema Master FSMO role, and disable outbound replication on him. To do it, simply run the following command:

Repadmin /Options *SchemaMasterName* +Disable_Outbound_Repl

2. If I have more than two Domain Controllers, additionally to disabling the outbound replication I also shutdown one of the DC’s.

Why do I do it?

1. If the Schema extension process went wrong, because I’ve disabled the outbound replication on that DC, other DC won’t get that Schema update. I will then remove that Domain Controller from the network, Seize the Schema Master role on one of the other DC’s and that’s it 

2. In the situation where I have more than two DC’s, additionally to be able to seize the role, I will also have the ability to completely remove the all Domain Controllers – but the one that was down. Since he was turned off, he didn’t get any replication, I can simply turn all DC’s of (and destroying them) and turn on that remaining DC and working from there.

If everything went well, and the extending of the Schema ended well (and it will!) I can simply remove the flag that disables the outbound replication by running the following command:

Repadmin /Options *SchemaMasterName* -Disable_Outbound_Repl

And making sure that all Domain Controllers are replicated by running the following command:

Repadmin /SyncAll /e /A

If I had a DC shutdown before the process I will only turn it on only after I made sure that the replication to the other DC’s went well – and in fact you can leave him off for a couple of days. Just to make Sure!

via How to extend AD schema without replicating to other servers – itbl0b.

Best Practices for Implementing Schema Updates or : How I Learned to Stop Worrying and Love the Forest Recovery

28 May 2012 6:02 PM

Note:  This is general best practice guidance for implementing schema extensions, not the testing of their functionality.  There may be some additional best practices around design and functionality of schema extensions that should be considered.  Understand that the implementation of a schema extension may well succeed, but the functionality around the extension may not behave as expected.

As with any change to the Active Directory infrastructure, the two primary concerns around implementing a schema extension are:

1. Have you tested it, so you can be reasonably sure it will behave as expected when implemented in production?

2. Do you have a roll-back plan?  And is it tested?

Digging into the details of each of these is where things get a little stickier.  However, having personally helped customers with dozens of schema updates, I can honestly say that staying within best practices isn’t that hard, and definitely makes implementation less risky and less stressful.

Have you tested your schema update, so you can be reasonably sure it will behave as expected when implemented in production?

The reason this question gets so sticky is that customers either don’t have a test environment, or they don’t have a test environment that reasonably reflects the production environment.  With respect to testing a schema extension, the best test environment is one that has an identical schema to the production environment.  How can you build and/or maintain a test environment that has a schema that is identical to production?

1. Maintain a test Active Directory environment.  On an ongoing basis, be sure to apply all schema extensions to your test environment that you do to your production environment.

2. Build a test Active Directory environment, then synchronize the schema to production.  Specifically:

a. Start by building the test environment to the same AD version as production.  That is, if all your production DCs are Windows Server 2003 or lower, make sure your test environment has a 2003 schema.  If the production schema has been extended to 2008 R2, apply the 2008 R2 schema extensions to your test environment.

b. Apply other any known production schema extensions to the test environment.  This includes things like Exchange, OCS, LYNC or SCCM.

c. Fellow PFE Ashley McGlone has a cool PowerShell script that will analyze your production schema for other extensions, to help you “remember” any other schema extensions.

d. AD LDS (formally known as ADAM) has an awesome schema analyzer tool that will compare two schemas, and prepare an ldif file so you can actually synchronize the schemas.  You should definitely use this tool to otherwise sync the schemas across your production and test environments.

3. Perform a Forest Recovery Test on your production forest.  (Please be sure you isolate your recovery environment when you test forest recovery).  Your recovered forest will most certainly have an identical schema to production.  Perform your schema update test on this recovered environment.

Typically people will shy away from #3 because it seems the hardest (and potentially most dangerous if you forget to fully isolate the recovered forest).  However, based on my experiences, I think #3 is the best option.  Why?  Because if forces you to do something you should be doing anyways (see the section below), and there is no doubt that the schema in your test/recovered environment will be the same as the schema in production.

Do you have a roll-back plan?  And is it tested?

There’s no delicate way of saying this, so I’m just going to say it:

The only supported/guaranteed way to roll back a schema change is a full forest recovery.

Thus, the best (only?) roll-back plan is a well-designed, documented and tested forest recovery plan.  I know it sounds harsh (and it is), but you must be prepared for forest recovery.  A couple points to make this otherwise bitter pill a bit easier to swallow:

1. You should have a documented and tested forest recovery plan anyways.  It’s a general best practice.  You’ve probably been ignoring it for a while, so if you’re serious about a roll-back plan for your schema update, now is the time to get serious about documenting and testing forest recovery plan.

2. It’s not as hard as it appears.  But it is very unforgiving in the details.  We’ve got a great whitepaper to help you through the details.

3. You can actually kill two birds with one stone here.  The forest recovery test will actually generate a great test environment for testing your schema extension (see option #3, above, for testing schema updates).

If you’ve avoided testing forest recovery this long, I expect you won’t go down without a fight.  Here are some of the “alternatives” I’ve heard people used for potential roll-back strategies:

1. Disable inbound/outbound replication on the schema master.  Then perform the schema update on the schema master.  Any badness is contained to the schema master.  If something goes bad, blow up the schema master and repair the rest of the forest (seize schema master on another DC and clean out the old schema master).

2. Shut down/stop replication on select DCs.  Do the schema upgrade, and if something goes bad, kill all the DCs that were on-line and may have potentially replicated the “badness”.    Light up the DCs that were offline and repair/restore your forest.

Typically, I don’t like to go down those rabbit-holes.  First, choosing one of those strategies still does not absolve you from needing a documented and tested forest recovery plan.  Second, either of those strategies requires a good bit of work in preparing and executing.  Failure to execute properly could be disastrous.  Third, if I’m upgrading the schema I like to make sure AD replication is healthy before, during and after the update.  Taking DCs offline, or isolating them, significantly impairs the ability to check health, you need to be on your toes to distinguish real errors from self-inflicted errors (caused by the isolation).  Finally, be aware that for some schema upgrades (ADPREP specifically), Microsoft recommends against disabling replication on the schema master. Also, check out another strong recommendation against isolation.

Thus, I would recommend investing your valuable resources in a forest recovery test, and a schema extension test (on the recovered forest).  After that, there’s not a lot of value in additional risk-mitigation strategies like schema master isolation.  If you’ve tested the schema extension and validated recovery you’ve done your due diligence, so know the odds are monumentally in your favor.  Schema extensions, especially Microsoft-packaged schema extensions, have a proven and well-tested track record.  And real-life examples of customers needing to perform a production forest-recovery are almost non-existent.

Put it all together and it’s really quite simple

Get yourself in the habit of preparing for all schema extensions with a one-two step.  First, test your forest recovery plans.  Second, test your schema extensions in your recovery environment and in any other test/non-production environments you may have. The first time you perform the exercise, be sure to document. Every subsequent time, be sure to review/update your documentation. You can them be confident that you’ve done everything possible to insure the schema extension goes off without a hitch.

2 Free Microsoft Windows Server 2012 Antivirus Solutions.

2 Free Microsoft Windows Server 2012 Antivirus Solutions.

November 16th, 2013 by Andrea Matesi 1562 Views 


By default, Windows Server 2012 comes without a security solution.

This is especially important if you use 2012 as a robust workstation OS for your studying needs.

So, to protect your time-consuming lab-rat experiments, you might feel left “high and dry“.

‘Though not everything is lost, since there are 2 hacks you might wish to implement to provide a minimum form of protection to your lab.


1. Microsoft Security Essentials for Windows 7 into Windows Server 2012.

The first hack allows you to install Microsoft Security Essentials (MSE).

Microsoft Security Essentials is designed for Windows 7 and is not compatible (nor supported) on Windows Server 2012.

But if you insist, you might as well end-up installing it on your Windows Server 2012.

  1. Download a copy of MSE from Microsoft: http://windows.microsoft.com/en-us/windows/security-essentials-all-versions
  2. Right Click on the “mseinstall.exe”.
  3. Click on Properties.
  4. Click on the “Compatibility”-tab.
  5. Locate the “Compatibility mode”-section.
  6. Check “Run this program in compatibility mode for:”.
  7. Select From the (now active) dropdown menu “Windows 7″.
  8. Open a Command Prompt as Administrator.
  9. cd to your Downloads folder (ie. cd C:\Users\%username%\Downloads).
  10. Run “mseinstall /disableoslimit” and follow the installer prompts to install MSE on your Windows Server 2012.


2. Microsoft Endpoint Protection 2012 (part of the System Center 2012 suite).

Microsoft Endpoint Protection 2012 is part of a freaking awesome Microsoft System Center suite.

For further info, please refer to http://en.wikipedia.org/wiki/System_Center#Microsoft_System_Center

They are all fully integrated & automated Client/Server solutions that satisfy specific system administration requirements (in addition to the already excellent features provided by Windows Server).

Among those, there’s Microsoft Endpoint Protection 2012, which is a Client/Server Security solution that fully integrates with your Active Directory Domain.

In layman’s words, Microsoft Endpoint Protection 2012 could be considered as the “full” version of Microsoft Security Essentials (aka Windows Defender on Windows 8/8.1).

The solution includes both a “Server” application (ie. to deploy on your application server) and a “Client” counterpart (ie. for your workstations).

  • The hack here is the possibility to run the Client as a “standalone” product (ie. without the Server application).

Not only, you can get the client “for free”, by simply downloading the Trial version of the entire Microsoft Endpoint Protection 2012 suite (trial refers to the Server Application).

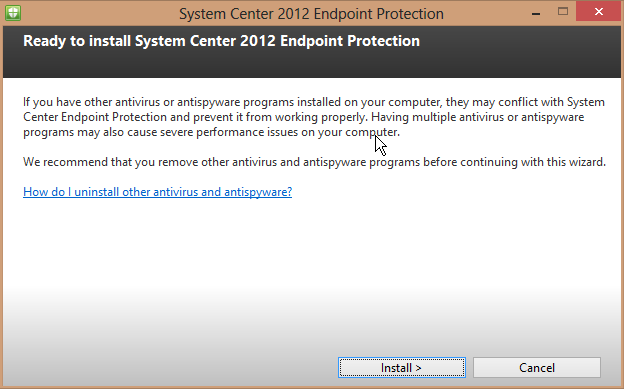
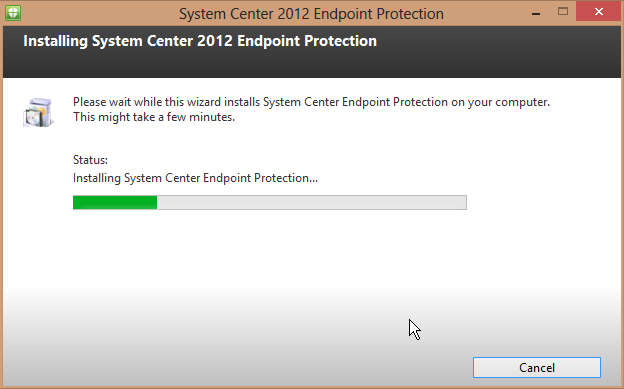
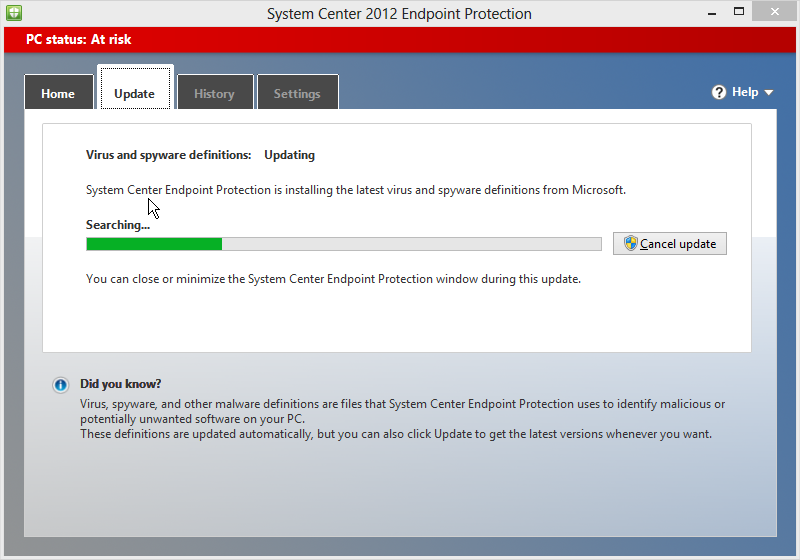
To install System Center 2012 Endpoint Protection on Windows Server 2012 proceed as follows:

  • Download Microsoft System Center Configuration Manager and Enpoint Protection 2012 SP1 from the following address:

http://technet.microsoft.com/en-US/evalcenter/hh667640.aspx?wt.mc_id=TEC_105_1_33

Once you obtain the package (mine was named SC2012_SP1_RTM_SCCM_SCEP.exe and it was 613MB):

  1. Right Click on it and open the archive with 7zip.
  2. Extract the “CLIENT”-Folder from SC2012_SP1_RTM_SCCM_SCEP.exe into a temporary location.
  3. Browse to the CLIENT folder with Windows Explorer and run “SCEPINSTALL.exe”.
  4. Follow the installer Prompts and you’ll end up with a fully featured  Security Solution courtesy of Microsoft.

System Center 2012 Endpoint Protection System Center 2012 Endpoint Protection System Center 2012 Endpoint Protection System Center 2012 Endpoint Protection


Personal remarks.

Now, apart from what’s moral and what’s not, Microsoft highly likely wishes you to “give it a go” (at their own Security solutions).

Despite glorious bugs that made glowing news during the previous decade, Microsoft takes a serious stand when it comes to Security.

How?! For one, by constantly releasing Windows “Security Updates”.

Pair that with a basic form of malware protection and you might just end up covering 80% of your security needs.

Independent testing says:”meh..!“.

If you asked me what’s my favourite professional security suite, I’d say:”it depends“.

If you’re an SMB with limited resources (and perhaps close to none IT personnel), then I’d lean towards a fully managed OOB solution (like Bitdefender).

If you’re a Windows-only Enterprise or Government organization, then I’d lean towards a secured Active Directory domain environment (ie. w/Applocker & IPSec), with the integration & automation provided by Microsoft System Center-based solutions (such as Endpoint Protection 2012).

Thoughts welcome.

error = (converter.fault.CloneFault) Unknown exception | Notes of Windows Admin

error = (converter.fault.CloneFault) Unknown exception

2 Votes

I needed to run P2V conversion across two domains. All the required ports were open, but at 1% of progress I got the error with this message in a log file:

–> state = “error”,

–> cancelled = false,

–> cancelable = true,

–> data = <unset>,

–> error = (converter.fault.CloneFault) {

–> dynamicType = <unset>,

–> faultCause = (vmodl.MethodFault) null,

–> description = “Unknown exception”,

–> msg = “An error occurred during the conversion: ‘Unknown exception’”,

–> },

Even though I should have known that from the beginning, I spent some time searching for the resolution. It was fairly simple.

ESX is very sensitive to DNS. Each and every participating device should be able to resolve its partner’s name. Fixing this with hosts file and new DNS entries wherever possible resolved the issue.

via error = (converter.fault.CloneFault) Unknown exception | Notes of Windows Admin.

IT: Updating to KMS from MAK: Product Keys

Updating to KMS from MAK: Product Keys

Use this table to find the correct Generic Volume License Key (GLVK) to use our Key Management Service (KMS) with the edition of Windows installed on your computer.

If you are unsure of the exact version of Windows, click on the Start orb, right-click Computer, and select Properties from the menu that appears.

In the table below, Windows versions ending with “E” are the international versions, and those ending with “N” are the versions without Windows Media Player.

Note: You cannot use a GLVK by itself to activate a Microsoft product. They only work in conjunction with a KMS server.

Platform

Operating system edition

Product key (GLVK)

Client Windows 8 Professional

NG4HW-VH26C-733KW-K6F98-J8CK4

Client Windows 8 Professional N

XCVCF-2NXM9-723PB-MHCB7-2RYQQ

Client Windows 8 Enterprise

32JNW-9KQ84-P47T8-D8GGY-CWCK7

Client Windows 8 Enterprise N

JMNMF-RHW7P-DMY6X-RF3DR-X2BQT

Client

Windows 7 Professional

FJ82H-XT6CR-J8D7P-XQJJ2-GPDD4

Client

Windows 7 Professional N

MRPKT-YTG23-K7D7T-X2JMM-QY7MG

Client

Windows 7 Professional E

W82YF-2Q76Y-63HXB-FGJG9-GF7QX

Client

Windows 7 Enterprise

33PXH-7Y6KF-2VJC9-XBBR8-HVTHH

Client

Windows 7 Enterprise N

YDRBP-3D83W-TY26F-D46B2-XCKRJ

Client

Windows 7 Enterprise E

C29WB-22CC8-VJ326-GHFJW-H9DH4


Server

Windows Server 2012 Core

BN3D2-R7TKB-3YPBD-8DRP2-27GG4

Server

Windows Server 2012 Core N

8N2M2-HWPGY-7PGT9-HGDD8-GVGGY

Server

Windows Server 2012 Core Single Language

2WN2H-YGCQR-KFX6K-CD6TF-84YXQ

Server

Windows Server 2012 Core Country Specific

4K36P-JN4VD-GDC6V-KDT89-DYFKP

Server Windows Server 2012 Server Standard

XC9B7-NBPP2-83J2H-RHMBY-92BT4

Server Windows Server 2012 Standard Core

XC9B7-NBPP2-83J2H-RHMBY-92BT4

Server Windows Server 2012 MultiPoint Standard

HM7DN-YVMH3-46JC3-XYTG7-CYQJJ

Server Windows Server 2012 MultiPoint Premium

XNH6W-2V9GX-RGJ4K-Y8X6F-QGJ2G

Server Windows Server 2012 Datacenter

48HP8-DN98B-MYWDG-T2DCC-8W83P

Server Windows Server 2012 Datacenter Core

48HP8-DN98B-MYWDG-T2DCC-8W83P


Server

Windows Server 2008 R2 Web

6TPJF-RBVHG-WBW2R-86QPH-6RTM4

Server

Windows Server 2008 R2 HPC edition

FKJQ8-TMCVP-FRMR7-4WR42-3JCD7

Server

Windows Server 2008 R2 Standard

YC6KT-GKW9T-YTKYR-T4X34-R7VHC

Server

Windows Server 2008 R2 Enterprise

489J6-VHDMP-X63PK-3K798-CPX3Y

Server

Windows Server 2008 R2 Datacenter

74YFP-3QFB3-KQT8W-PMXWJ-7M648

Server

Windows Server 2008 R2 for Itanium-based Systems

GT63C-RJFQ3-4GMB6-BRFB9-CB83V


Server

Windows Web Server 2008

WYR28-R7TFJ-3X2YQ-YCY4H-M249D

Server

Windows Server 2008 Standard

TM24T-X9RMF-VWXK6-X8JC9-BFGM2

Server

Windows Server 2008 Standard without Hyper-V

W7VD6-7JFBR-RX26B-YKQ3Y-6FFFJ

Server

Windows Server 2008 Enterprise

YQGMW-MPWTJ-34KDK-48M3W-X4Q6V

Server

Windows Server 2008 Enterprise without Hyper-V

39BXF-X8Q23-P2WWT-38T2F-G3FPG

Server

Windows Server 2008 HPC

RCTX3-KWVHP-BR6TB-RB6DM-6X7HP

Server

Windows Server 2008 Datacenter

7M67G-PC374-GR742-YH8V4-TCBY3

Server

Windows Server 2008 Datacenter without Hyper-V

22XQ2-VRXRG-P8D42-K34TD-G3QQC

Server

Windows Server 2008 for Itanium-Based Systems

4DWFP-JF3DJ-B7DTH-78FJB-PDRHK

You’ll use the appropriate GLVK to update installations of Windows that used MAK activation to the new (November 2010) MKS activation method.

via IT: Updating to KMS from MAK: Product Keys.

Server 2008R2 Standard giving “This copy of windows is not genuine” error, cannot run windows activation.

Server 2008R2 Standard giving “This copy of windows is not genuine” error, cannot run windows activation.

Windows Server forums  >  Windows Server General Forum

Question

0

Sign in to vote

I’ve got a windows 2k8R2 server in production that’s been running since mid October.  This morning we’re suddenly having production issues with the databases running on the box.

I connect in and the desktop is flat black with the Not genuine error showing on the bottom right of my desktop, which wasn’t there when I was last on the box several days before.  I know the box is valid and licensed.

I figured I’d try to launch the activation wizard again, so I enabled the internet NIC and launced the wizard, just in case it needed to be reactivated for some reason.  I got the following error:

Windows Activation: An error has occured.

Code: 0x80070422

Description: The service cannot be started, either because it is disabled or because it has no enabled services associated with it.


One more odd thing, launching the server manager, the server summary is completely blank:


http://www.geekforever.com/misc/wonkaf.gif


This seems to be such a general error that google and technet have been pretty useless so far, most of the 0x80070422 errors seem to be from Vista or the Windows 7 beta and were fixed via various registry repair tools, which I am loathe to run on Server2k8, especially one in production.

Help!

Wednesday, December 29, 2010 8:32 PM

Reply | Quote |

Ron PragueAsterisk Consulting0 Points

Answers

0

Sign in to vote

Hi,


For the activation error 0x80070422, it can be caused due to the following services are not running properly:


• Background Intelligent Transfer Service

• Software Protection

• SPP Notification Service


Please check their status via Services and try to activate again. What is the result?


Also, you can run “slmgr /dlv” in CMD prompt command line to see the details about the activation.


As Meinolf suggested, you can refer to the following link to contact the licensing team:


http://www.microsoft.com/licensing/contact-us.aspx


Thanks.

Nina

via Server 2008R2 Standard giving “This copy of windows is not genuine” error, cannot run windows activation..

VMware KB: Updating VMware Tools fails with the error: Update Tools failed. Edit the virtual machine’s vmx file

Updating VMware Tools fails with the error: Update Tools failed. Edit the virtual machine’s vmx file (2007298)

Symptoms

You are unable to update VMware Tools.

Updating VMware Tools fails.

You see the error:

Update Tools failed. Edit the virtual machine’s vmx file, add the line below and try again. Please read KB article 1714 on tips for editing a vmx file.

isolation.tools.guestInitiatedUpgrade.disable = “FALSE”

Cause

This issue occurs because, for security purposes, updating VMware Tools from within the guest is disabled by default.

Resolution

To resolve this issue, enable VMware Tools updates from within the guest by updating the virtual machine configuration file.

To update the virtual machine configuration file:

In Fusion, Player, or Workstation

Shut down the virtual machine if it is running.

Open the virtual machine configuration file (.vmx) using a text editor. For more information, see:

Fusion: Editing the .vmx file for your Fusion virtual machine (1014782)

Workstation: Tips for editing a .vmx file (1714)

Add this line to the end of the file:

isolation.tools.guestInitiatedUpgrade.disable = “FALSE”

Save and close the .vmx file.

Power on the virtual machine.

Start the VMware Tools upgrade within the guest operating system.

In ESXi/ESX using the vCenter Server GUI

Shut down the virtual machine if it is running.

Open the datastore browser and navigate to the virtual machine directory.

Using the GUI option, download the .vmx to your local desktop.

Create a backup of the .vmx on your local workstation.

Open the .vmx file using a text editor and add this line to the end of the file:

isolation.tools.guestInitiatedUpgrade.disable = “FALSE”

Note: For more information, see Tips for editing a .vmx file (1714).

When saved, upload the file via the datastore browser GUI.

Power on the virtual machine.

Verify functionality before deleting the .vmx backup on your local workstation.

Start the VMware Tools upgrade within the guest operating system.

In ESXi/ESX using the command line

Shut down the virtual machine if it is running.

Open an SSH session to a host. For more information, see Using ESXi Shell in ESXi 5.0 and 5.1 (2004746) or Using Tech Support Mode in ESXi 4.1 and ESXi 5.x (1017910).

Navigate to the virtual machine directory.

Run this command to create a backup of the .vmx file:

cp .vmx .vmx.backup

Open the .vmx file with a text editor and add this line to the end of the file:

isolation.tools.guestInitiatedUpgrade.disable = “FALSE”

Note: For more information, see Editing files on an ESX host using vi or nano (1020302).

Power on the virtual machine.

Verify the virtual machine is functional before deleting the backup file. To delete the backup file, run the command:

– rm .vmx.backup

Start the VMware Tools upgrade within the guest operating system.

Additional Information

Note: To work around this issue, connect directly to the ESXi/ESX host or the vCenter Server and upgrade VMware Tools on the virtual machine. For more information, see General VMware Tools installation instructions (1014294).

Tags

cannot-install-tools  install-vmware-tools-fails  vmware-tools-install-fails  vmware-tools-install-upgrade-fails  vmware-tools-upgrade-fails  upgrading-vmware-tools-fails  missing-setting

See Also

General VMware Tools installation instructions

Editing the .vmx file for your VMware Fusion virtual machine

Using Tech Support Mode in ESXi 4.1 and ESXi 5.x

Editing files on an ESX host using vi or nano

Tips for editing a .vmx file

Using ESXi Shell in ESXi 5.0 and 5.1

Update History

2/27/2012 – Added steps to edit .vmx in ESXi

04/01/2013 – Added information about cause.

09/06/2013 – Added VMware Player 6.x (Windows & Linux) and Workstation 10.x (Windows & Linux) and Fusion 6.x to Product Versions.

via VMware KB: Updating VMware Tools fails with the error: Update Tools failed. Edit the virtual machine’s vmx file.

Synchronize replication with all partners: Active Directory

Synchronize replication with all partners: Active Directory.


Synchronize replication with all partners

0 out of 1 rated this helpful – Rate this topic

Updated: June 8, 2005

Applies To: Windows Server 2003, Windows Server 2003 R2, Windows Server 2003 with SP1, Windows Server 2003 with SP2

You can use this procedure to synchronize replication with all replication partners of a domain controller.

Administrative credentials

To perform this procedure, you must be a member of the Domain Admins group in the domain of the selected domain controller or the Enterprise Admins group in the forest, or you must have been delegated the appropriate authority. If you want to synchronize the configuration and schema directory partitions on a domain controller in a child domain, you must have Domain Admins credentials in the forest root domain or Enterprise Admins credentials in the forest.

To synchronize replication with all partners

  1. At a command prompt, type the following command, and then press ENTER:

    repadmin /syncall DCName /e /d /A /P /q

    Term Definition

    DCName

    The Domain Name System (DNS) name of the domain controller on which you want synchronize replication with all partners

    /e

    Enterprise; includes partners in all sites.

    /d

    Identifies servers by distinguished name in messages.

    /A

    All; synchronizes all directory partitions that are held on the home server.

    /P

    Pushes changes outward from the home server.

    /q

    Runs in quiet mode; suppresses callback messages.

  2. Check for replication errors in the output of the command in the previous step. If there are no errors, replication is successful. For replication to complete, any errors must be corrected.

See Also